| Version 6 (modified by , 6 years ago) ( diff ) |
|---|
Configuring SSH Keys
SSH access to COSMOS machines requires the use of public key authentication. If you try to connect using the username and password that you use for accessing the scheduler and status pages, you will receive the following message:
Permission denied (publickey).
You need to configure the SSH client on your computer to use a private key for connecting to COSMOS machines instead of a password. Additionally, the corresponding public key needs to be added to your COSMOS account. This page describes the procedure for generating a public/private key pair, configuring your SSH client, and uploading the necessary public key to your COSMOS account. The instructions here are for specific SSH client software, if you use a different SSH client than those referenced here, please follow the documentation provided with that SSH client and use the instructions here for reference.
Select the OS of your computer
Linux
NOTE: These instructions are NOT for Ubuntu running on Windows using Windows Subsystem for Linux (WSL).
These instructions assume you will be using a standard command-line SSH client for linux. If you have not already done so, ensure that you have it installed by running the following commands in a command-line terminal:
sudo apt-get update
sudo apt-get install openssh-client
Generating keys
Each distribution has their own location for the specific generation tools. These instructions are based on the documentation for Ubuntu (located here).
To create your public and private SSH keys, open a command-line terminal and type:
ssh-keygen -t rsaYou will be prompted for a location to save the keys, and a passphrase for the keys which we highly recommend using. This passphrase does not have to be the same as your COSMOS account password.
Generating public/private rsa key pair.
Enter file in which to save the key (...):
Enter passphrase (empty for no passphrase):
Enter same passphrase again:
Your identification has been saved in ...
Your public key has been saved in ...
Your public key is now available as .ssh/id_rsa.pub in your home folder.
This process will generate and store a private key and a public key file. The private key will be stored in the file and location you specify when prompted, and the public key file will be named the same as your private key file but with a .pub extension.
Uploading your public key to your COSMOS account
To upload you public key to your cosmos account, do the following:
- Go to https://www.cosmos-lab.org/cPanel/controlPanel/start and sign in with your COSMOS username and password
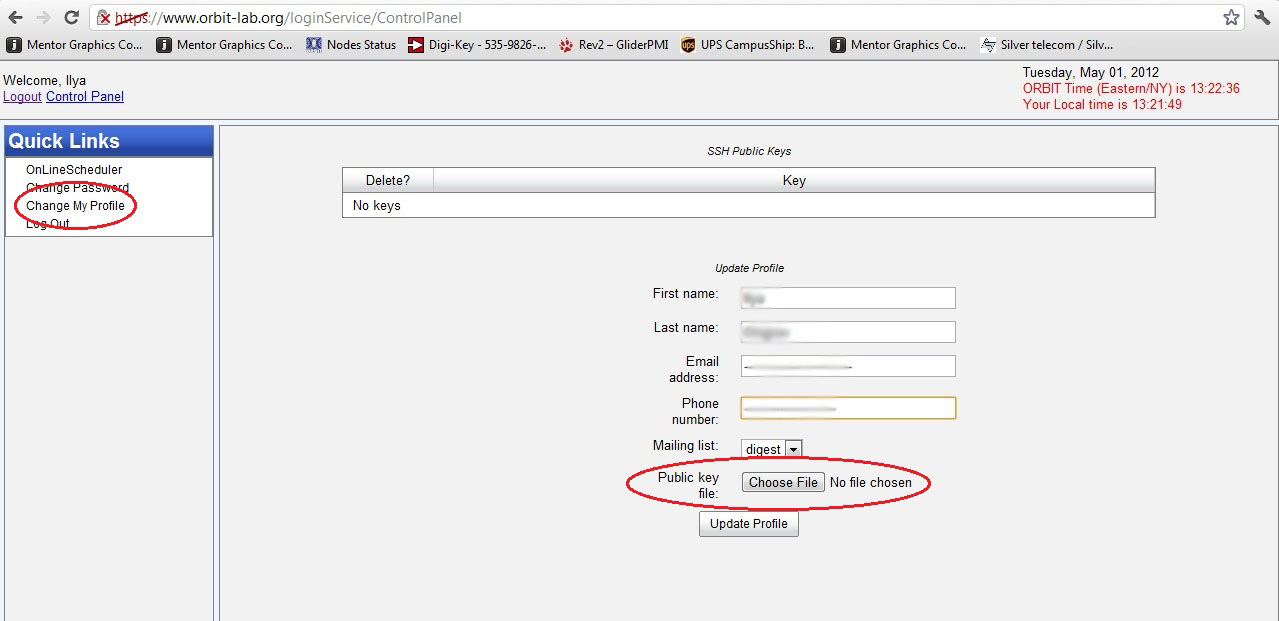
- Click on "Change My Profile" option in the left side menu
- Click the "Choose File" button next to "Public key file"
- Navigate to where your public key file is stored (typically /home/your_username/.ssh)
- Select the .pub file corresponding to the key you wish to use for COSMOS access
- Click "Open"
- Click the "Update Profile" button
As a side note, expect to see a default auto generated public key in the list (ends with @internal1). This is used for SSH access between machines inside the COSMOS network. Please do NOT delete this key.
Configuring your SSH client
Under normal circumstances, as long as the private key file is located in the /home/your_username/.ssh/ folder, the command line SSH client will use the correct key when connecting.
To test your setup, open a command-line terminal and (replacing your_cosmos_username with your own COSMOS username) type:
ssh your_cosmos_username@gw.orbit-lab.orgYou should be prompted to enter your key file passphrase and be able to successfully connect.
Type
exitand press the Enter key to end the SSH session.
Common issues and how to solve them
- If you receive a message like the following:
The authenticity of host 'gw.orbit-lab.org (128.6.192.134)' can't be established.
ECDSA key fingerprint is SHA256:iLKtq2Z8wB3ADJdEyM1CwoU85gOeqIUyB4GOJ2YloQg.
Are you sure you want to continue connecting (yes/no)?
This is a normal message that occurs when your computer connects via SSH to another that it has never connected to before or if the "fingerprint" of the other machine changed (due to replacement or reconfiguration). Simply typeyesand connection will proceed normally.
- If you receive a message like the following:
Permission denied (publickey).
Try connecting again but manually specifying the location where your private SSH key is stored as in the following example:ssh -i /path_to_where_key_is_stored/private_ssh_key_name your_cosmos_username@gw.orbit-lab.org
Windows
These instructions assume that you are using PuTTY as your SSH client.
Generating keys
In PuTTY, the key generation is handled by a separate program named puttygen.exe. If you installed PuTTY via the installer, there should be an icon for PuTTYgen in your Start menu, otherwise download it from here.
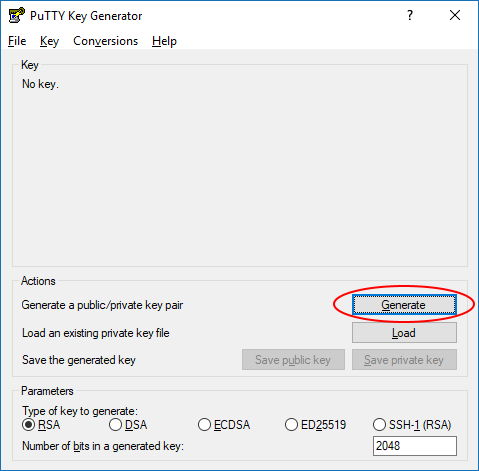
- Open PuTTYgen
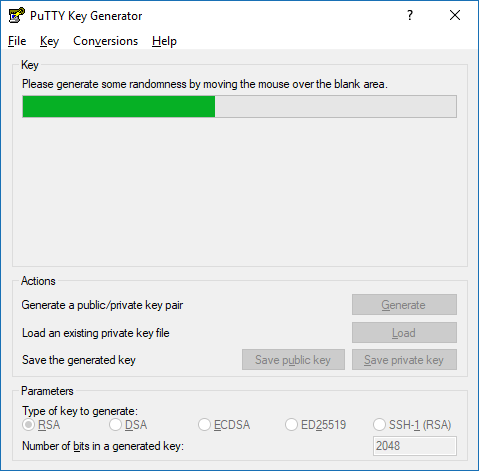
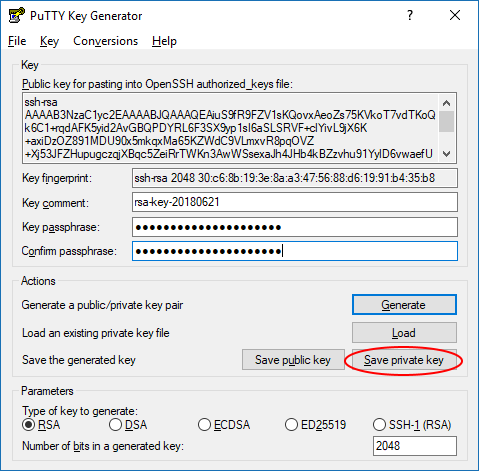
- Click the "Generate" button and follow the instructions in the "Key" section of the window
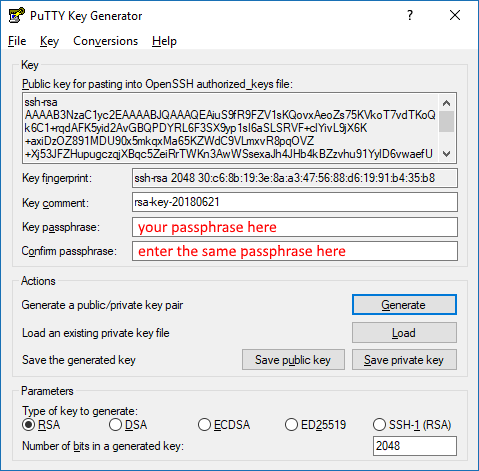
- Type a passphrase of your choice in the "Key passphrase" and "Confirm passphrase" fields. This passphrase does not have to be the same as your COSMOS account password.
- Click the "Save private key" button
- Save the private key file somewhere you will remember on your computer. Do not share this key with anyone!
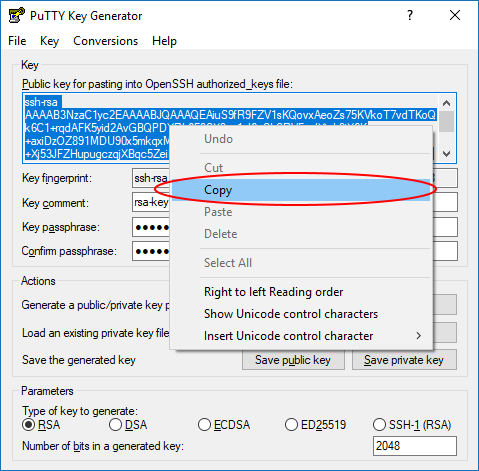
- After saving the private key file, right-click in the big text box labeled "Public key for pasting into OpenSSH authorized_keys file" and click "Select All" from the popup menu to highlight the entire public key
- Right-click again in the same big box and click "Copy" from the popup menu
- Open Notepad from your Start menu
- Paste what you just copied from PuTTYgen into Notepad. The contents should start with
ssh-rsaand end with something likersa-key-20180621(the same as the "Key comment" field in PuTTYgen)
- Save this file somewhere you will remember on your computer. This is your public key file.
- Close PuTTYgen
Uploading your public key to you COSMOS account
NOTE: Internet Explorer is not supported for Control Panel operations (including key upload)
To upload you public key to your cosmos account, do the following:
- Go to https://www.cosmos-lab.org/cPanel/controlPanel/start and sign in with your COSMOS username and password
- Click on "Change My Profile" option in the left side menu
- Click the "Choose File" button next to "Public key file"
- Navigate to where your public key file is stored (the file you saved with Notepad in the previous section)
- Select the public key file you wish to use for COSMOS access
- Click "Open"
- Click the "Update Profile" button
As a side note, expect to see a default auto generated public key in the list (ends with @internal1). This is used for SSH access between machines inside the COSMOS network. Please do NOT delete this key.
Configuring your SSH client
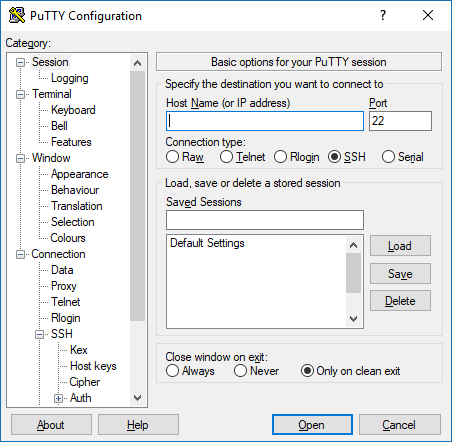
- Open PuTTY.
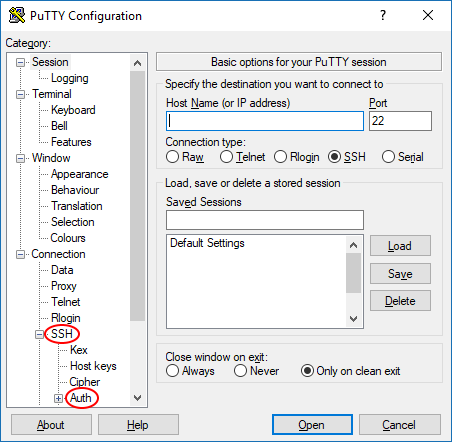
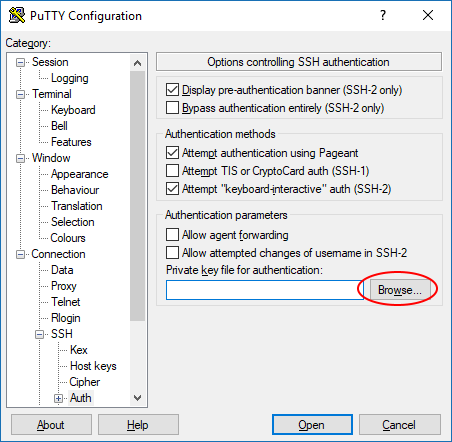
- Navigate through the left side menu tree to "SSH" then "Auth".
- Click the "Browse" button next to the "Private key file for authentication" field.
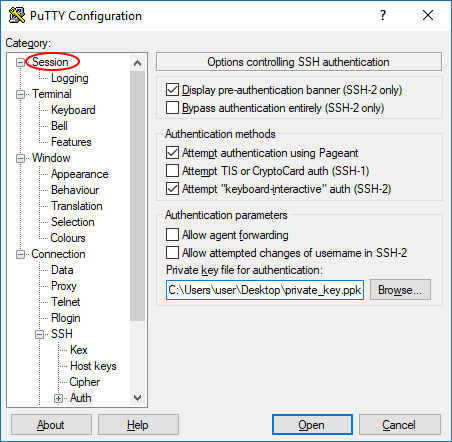
- Navigate to where you saved your private key file in the previous section and select it.
- Navigate through the left side menu tree back to "Session".
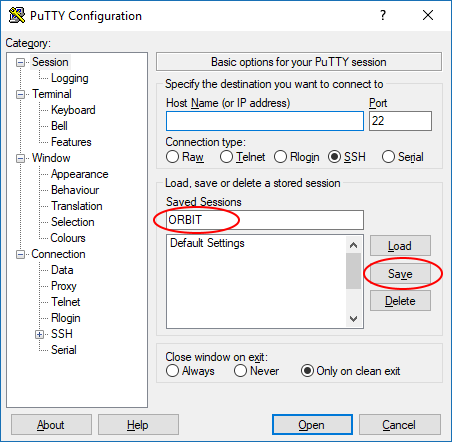
- Enter a name for this connection in the "Saved Sessions" field and click the "Save" button.
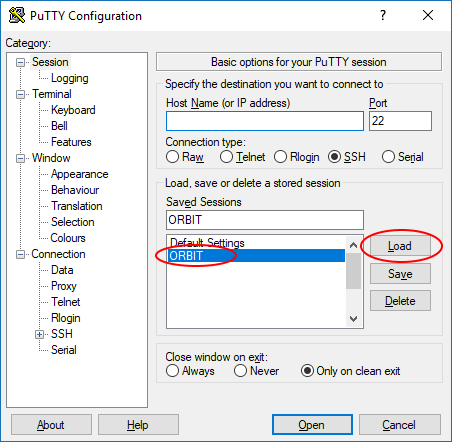
- Now whenever you open PuTTY, select the session name you gave in the previous step and click "Load", this will load the private key file automatically so you do not have to repeat the prior steps each time (as long as you do not move it to a different folder on your computer).
- Type
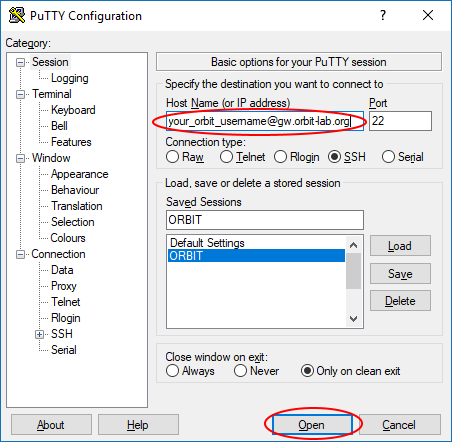
your_cosmos_username@gw.orbit-lab.org(replacing your_cosmos_username with your own COSMOS username) into the "Host Name (or IP address)" field and click the "Open" button. You should be prompted to enter your key file passphrase and be able to successfully connect.
- Type
exitand press the Enter key to end the SSH session.
Common issues and how to solve them
- If you receive a message like the following:
The authenticity of host 'gw.orbit-lab.org (128.6.192.134)' can't be established.
ECDSA key fingerprint is SHA256:iLKtq2Z8wB3ADJdEyM1CwoU85gOeqIUyB4GOJ2YloQg.
Are you sure you want to continue connecting (yes/no)?
or
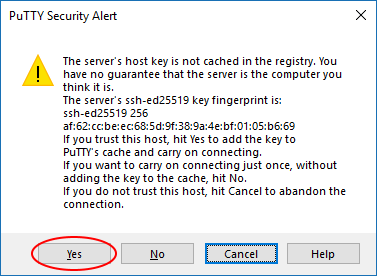
This is a normal message that occurs when your computer connects via SSH to another that it has never connected to before or if the "fingerprint" of the other machine changed (due to replacement or reconfiguration). Simply type
yesor click "Yes" and connection will proceed normally.
Mac
Mac instrucstions are currently under development. We apologize for the inconvenience.
Generating keys
TODO
Uploading your public key to you COSMOS account
To upload you public key to your cosmos account, do the following:
- Go to https://www.cosmos-lab.org/cPanel/controlPanel/start and sign in with your COSMOS username and password
- Click on "Change My Profile" option in the left side menu
- Click the "Choose File" button next to "Public key file"
- Navigate to where your public key file is stored (typically /home/your_username/.ssh)
- Select the .pub file corresponding to the key you wish to use for COSMOS access
- Click "Open"
- Click the "Update Profile" button
As a side note, expect to see a default auto generated public key in the list (ends with @internal1). This is used for SSH access between machines inside the COSMOS network. Please do NOT delete this key.
Configuring your SSH client
TODO
Common issues and how to solve them
- TODO
SSH Tunneling
A common need is to connect to some resource on the testbed, as if it were local. SSH provides this functionality.
The simplest variant is via an openssh config file.
On Linux or Mac, via the terminal, make or edit a file at
~/.ssh/config by default.
Make an entry like the following, replacing the specifics as needed
Host console.sb1.cosmos-lab.org
  LocalForward 9001 srv1-lg1.sb1.cosmos-lab.org:80
Now, when you ssh to console.sb1.cosmos-lab.org, traffic that you send to localhost port 9001, will be proxied and sent to srv1-lg1.sb1.cosmos-lab.org port 80. We commonly use this to access webUIs and similar things running on a node.
Most SSH clients for other platforms have similar functionality. The important thing is to remember that the left side is your local port, and the right side is something that $HOST can talk to.
To forward an additional port, or the same port on another device, add more lines.
LocalForward 9002 srv1-lg1.sb1.cosmos-lab.org:443
LocalForward 9003 srv1-lg1.sb1.cosmos-lab.org:80
LocalForward 9004 srv3-lg1.sb1.cosmos-lab.org:9090
Just ensure that the ports on the left don't conflict.
Common SSH issues
If you deleted the "@internal1" key from your profile
As long as you have at least one public key configured in your profile, use your SSH client to connect to gw.orbit-lab.org and run the following commands there. You do not need to make a reservation in the scheduler for this.
rm ~/.ssh/id_rsa
rm ~/.ssh/id_rsa.pub
ssh-keygen -t rsa -C "@internal1"
Press 'Enter' at every prompt so that the default filename (id_rsa) and no password is used.
Then type the following command:
cat ~/.ssh/id_rsa.pub >> ~/.ssh/authorized_keys
The internal key should now be restored.
Common ssh options for nodes
We'd like to do a few things for convenience:
- log into nodes as root by default
- allow forwarding of X11 applications
- Suppress annoying host key warnings
First, log into any console, or gw.orbit-lab.org
After logging in, create or modify the file at ~/.ssh/config
Add the following to the file
Host sdr?-md* sdr?-s?-lg* srv?-co* srv?-lg* node?-* node??-*
  User root
  UserKnownHostsFile /dev/null
  StrictHostKeyChecking no
  ForwardX11 yes
- Host: The Host line matches common naming conventions for nodes within the testbed
- User: root is set to match the common default for baseline
- UserKnownHostsFile: is set to /dev/null to prevent saving new host keys for nodes
- StrictHostKeyChecking: disables the warning message. SSH complains when host keys for a dns name change. This is a useful security feature, but is inconvenient within the testbed, where the operating system on a trusted machine changes frequently. Do not set it as a wildcard default for public endpoints, or you will be vulnerable to spoofing or man in the middle attacks.
- ForwardX11: allows the forwarding of graphical applications running the X11 protocol from a node back to your machine
Attachments (16)
- ControlPanel.jpg (108.5 KB ) - added by 7 years ago.
- putty_alert.png (10.7 KB ) - added by 7 years ago.
- putty01.png (19.3 KB ) - added by 7 years ago.
- putty02.png (20.3 KB ) - added by 7 years ago.
- putty03.png (20.8 KB ) - added by 7 years ago.
- putty04.png (21.0 KB ) - added by 7 years ago.
- putty05.png (19.4 KB ) - added by 7 years ago.
- putty06.png (19.5 KB ) - added by 7 years ago.
- putty07.png (21.1 KB ) - added by 7 years ago.
- puttygen01.png (11.8 KB ) - added by 7 years ago.
- puttygen02.png (11.0 KB ) - added by 7 years ago.
- puttygen03.png (25.2 KB ) - added by 7 years ago.
- puttygen04.png (22.6 KB ) - added by 7 years ago.
- puttygen05.png (24.1 KB ) - added by 7 years ago.
- puttygen06.png (23.4 KB ) - added by 7 years ago.
- wiki_profile.png (11.2 KB ) - added by 6 years ago.
Download all attachments as: .zip

