| Version 23 (modified by , 6 years ago) ( diff ) |
|---|
802.11ad Preamble Processing blocks on COSMOS SandBox1 (IN PROGRESS)
Description
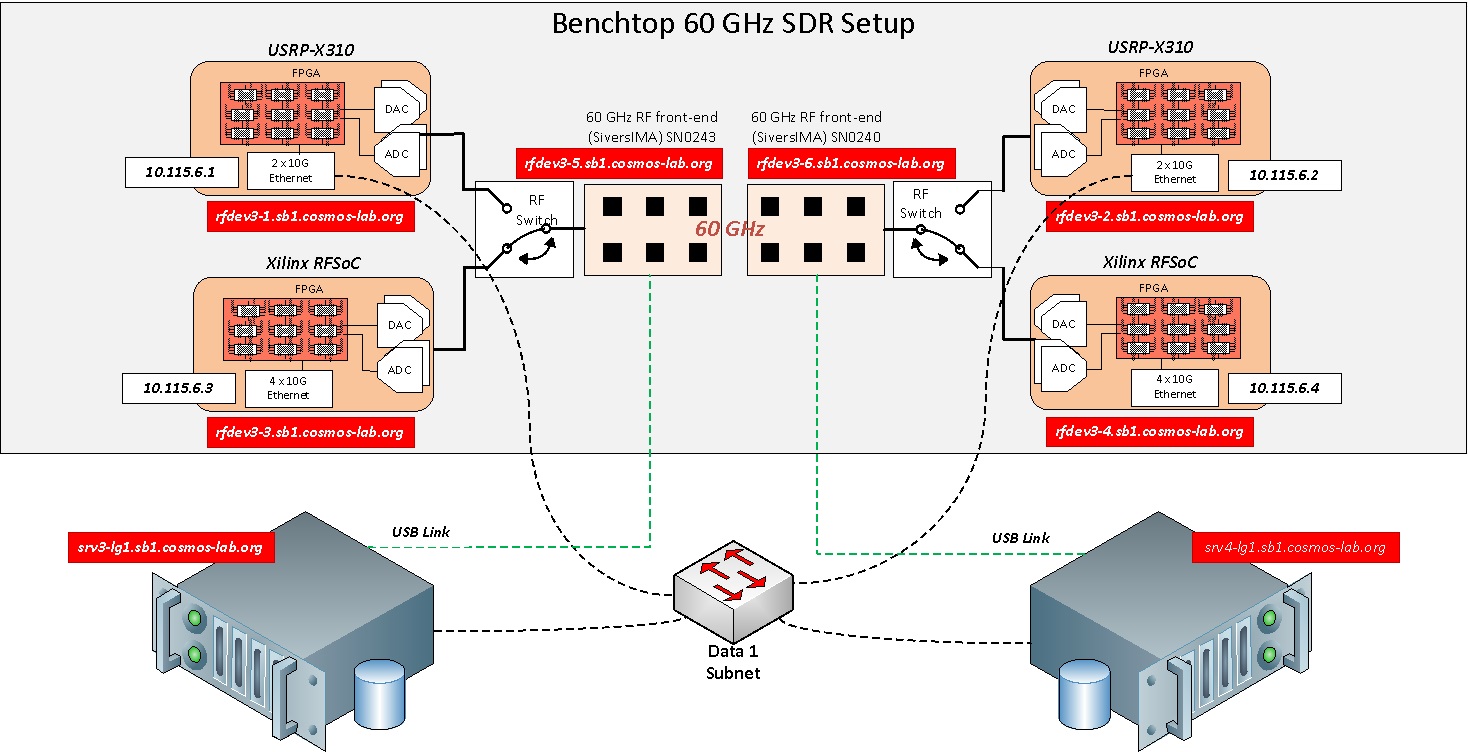
This tutorial describes how to use RFNoC 802.11ad preamble processing blocks with Sivers 60GHz front-ends on COSMOS SandBox1.
Prerequisites
In order to access the test bed, create a reservation and have it approved by the reservation service. Access to the resources is granted after the reservation is confirmed. Please follow the process shown on the COSMOS work flow page to get started.
Resources required
4 servers srv1-lg1 to srv4-lg1, 2 USRP X310s rfdev3-1, rfdev3-2 and both the Sivers platforms rfdev3-5, rfdev3-6 on COSMOS SB1.
Tutorial Setup
Follow the steps below to gain access to the sandbox 1 console and set up nodes with appropriate images.
- If you don't have one already, sign up for a COSMOS account
- Create a resource reservation on sandbox 1
- Login into sandbox 1 console (console.sb1.cosmos-lab.org) with two SSH sessions.
- Make sure all the nodes and devices used in the experiment are turned off:
omf tell -a offh -t srv1-lg1,srv2-lg1,srv3-lg1,srv4-lg1,rfdev3-1,rfdev3-2,rfdev3-5,rfdev3-6
- The image rfnoc_wigig.ndz has aforementioned RFNoC 802.11ad preamble processing blocks installed.
Load rfnoc_wigig.ndz on srv1,srv2. The image sivers_sb1_cosmos.ndz has UHD and Sivers control software installed.
Load sivers_sb1_cosmos.ndz on srv3,srv4.
omf load -i rfnoc_wigig.ndz -t srv1-lg1,srv2-lg1
omf load -i sivers_sb1_cosmos.ndz -t srv3-lg1,srv4-lg1
- Turn all the required resources on and check the status
omf tell -a on -t srv1-lg1,srv2-lg1,srv3-lg1,srv4-lg1,rfdev3-1,rfdev3-2,rfdev3-5,rfdev3-6
omf stat -t system:topo:allres
- ssh to the nodes, use option -Y for using GUI.
Experiment Execution
Find and prepare USRPs
- The IP addresses for Ethernet Port 1(10G) on the X310s sdr2-md2 and sdr2-md3 were hard-coded to 10.115.2.2 and 10.115.2.3 respectively. To access them from srv1-lg1 or srv2-lg2, configure the network interface eno2 as follows
root@srv2-lg1:~# ifconfig eno2 10.115.1.1 netmask 255.255.0.0 mtu 9000 up
root@srv2-lg1:~# ifconfig eno2
eno2: flags=4163<UP,BROADCAST,RUNNING,MULTICAST>  mtu 9000
        inet 10.115.1.1  netmask 255.255.0.0  broadcast 10.115.255.255
        inet6 fe80::9a03:9bff:fe61:b0b1  prefixlen 64  scopeid 0x20<link>
        ether 98:03:9b:61:b0:b1  txqueuelen 1000  (Ethernet)
        RX packets 4661357820  bytes 37005247545892 (37.0 TB)
        RX errors 0  dropped 692293  overruns 0  frame 0
        TX packets 59454137  bytes 3576874343 (3.5 GB)
        TX errors 0  dropped 0 overruns 0  carrier 0  collisions 0
- Run uhd_find_devices to check if the X310s can be reached
root@srv2-lg1:~# uhd_find_devices --args="addr=10.115.2.3"
[INFO] [UHD] linux; GNU C++ version 7.4.0; Boost_106501; UHD_3.14.1.1-release
--------------------------------------------------
-- UHD Device 0
--------------------------------------------------
Device Address:
    serial: 31B6FFA
    addr: 10.115.2.3
    fpga: HG
    name: sdr2-md3
    product: X310
    type: x300
- Check which RFNoC blocks the are loaded on the X310s, by running uhd_usrp_probe
root@srv1-lg1:~# uhd_usrp_probe --args="addr=10.115.2.2"
- Following is the list of RFNoC blocks required for the experiment
|   |   |       RFNoC blocks on this device:
|   |   |
|   |   |   * DmaFIFO_0
|   |   |   * Radio_0
|   |   |   * Radio_1
|   |   |   * PacketDetector_0
|   |   |   * CFOC_0
|   |   |   * DDC_0
|   |   |   * DUC_0
|   |   |   * FIR_0
|   |   |   * SymbolTiming_0
|   |   |   * BoundaryDetector_0
|   |   |   * CIR_0
|   |   |   * FIFO_0
|   |   |   * FIFO_1
- If the required RFNoC blocks are not found, load X310 with MISO_IMAGE_x300.bit
root@srv1-lg1:~# uhd_image_loader --args="addr=10.115.2.2,type=x300" --fpga-path="ORCA_MISO_PROJECT/FPGA_IMAGES/MISO_IMAGE_x300.bit"
- Power cycle X310 to use the new image, and run uhd_usrp_probe to check RFNoC blocks.
root@console:~# omf tell -a offh -t rfdev3-1
root@console:~# omf tell -a on -t rfdev3-1
Prepare Sivers 60GHz front-ends
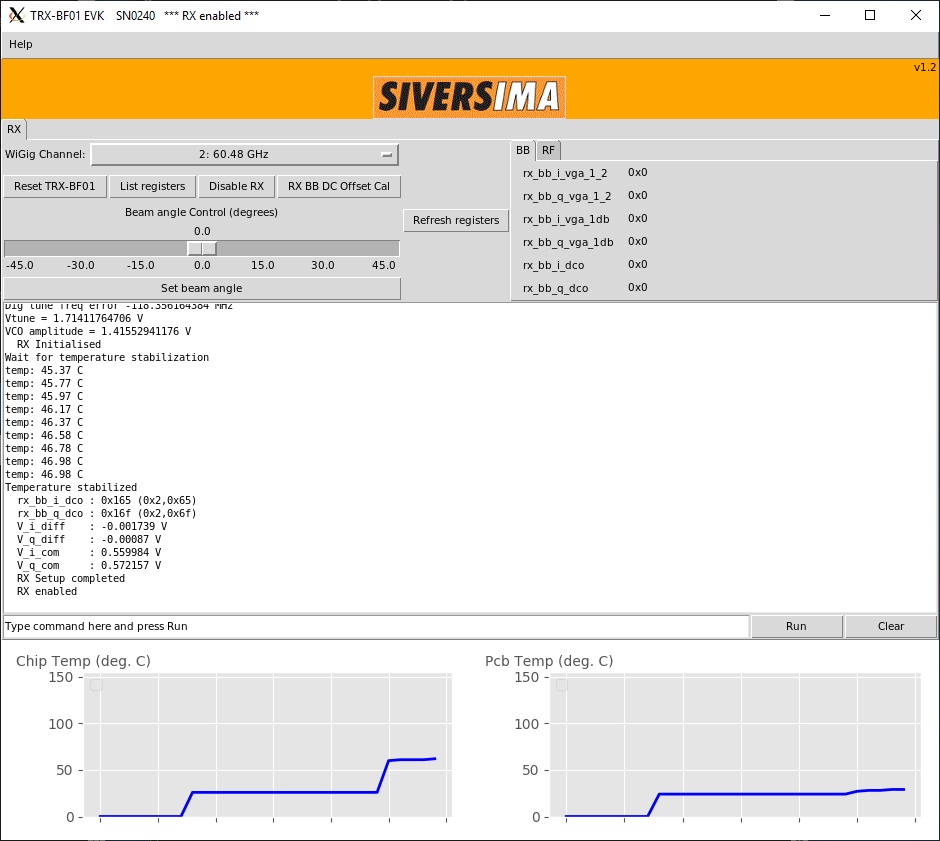
- To demonstrate the experiment here, we use Sivers front-end SN0240 as transmitter and SN0243 as receiver
| SN0240 as transmitter | SN0243 as receiver |
| root@srv4-lg1:~/ederenv# ./start_mb1.sh —gui SN0240 | root@srv3-lg1:~/ederenv# ./start_mb1.sh —gui SN0243 |
| Click "TX enable" and "LO leakage Cal" | Click "RX enable" |
 | 
|
Run the experiment
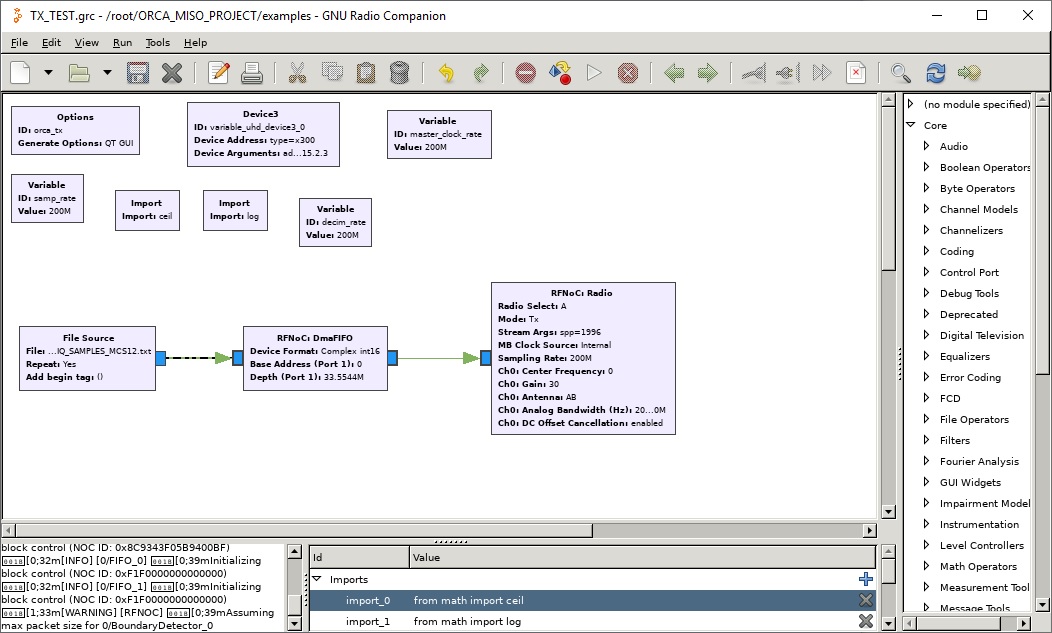
- Open transmit application TX_TEST.grc on transmit node(srv2-lg1). This application transmits 802.11ad frames over rfdev3-2(10.115.2.3), at 200MSPS, by reading samples from a pre-generated file.
- Open receive application RADIORX_CIR.grc on receive node(srv1-lg1). This application receives and processes samples over rfdev3-1(10.115.2.2) as seen in the grc model below. Channel impulse response computed for every frame is written into a file on the host node.
| root@srv2-lg1:~# gnuradio-companion TX_TEST.grc | root@srv1-lg1:~# gnuradio-companion RADIORX_CIR.grc |
 | 
|
- Run the applications.
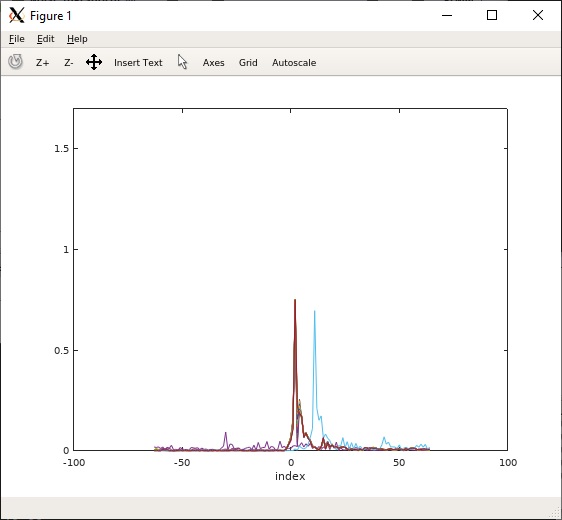
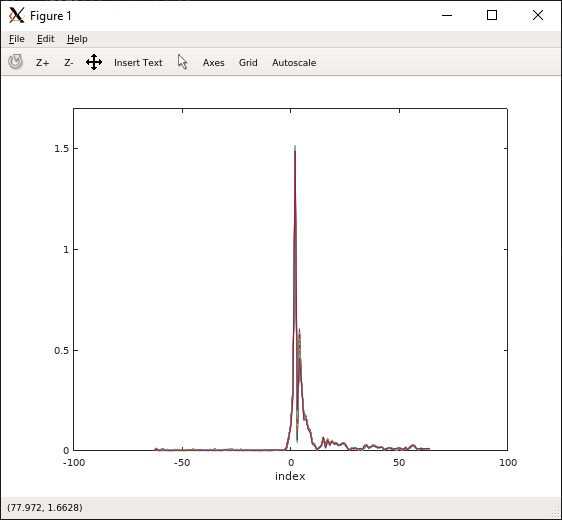
- Plot the CIR using CIR_read_out_file.m script
- Shown below are the CIR plots obtained for TX beam angles set to 0 and -5 degrees.
| TX beam angle 0 | TX beam angle -5 |
 | 
|
Attachments (9)
- Sivers_TX_GUI.jpg (174.4 KB ) - added by 6 years ago.
- Sivers_RX_GUI.jpg (126.9 KB ) - added by 6 years ago.
- Sivers_RX_SN0243.jpg (128.2 KB ) - added by 6 years ago.
- Sivers_TX_SN0240.jpg (162.6 KB ) - added by 6 years ago.
- radiorx_cir_grc.jpg (204.4 KB ) - added by 6 years ago.
- tx_test_grc.jpg (165.9 KB ) - added by 6 years ago.
- CIR_0.jpg (33.2 KB ) - added by 6 years ago.
- CIR_neg5.jpg (32.8 KB ) - added by 6 years ago.
- MISO_tutorial.jpg (256.2 KB ) - added by 6 years ago.
Download all attachments as: .zip
Note:
See TracWiki
for help on using the wiki.