Site Navigation
Scheduling and Reservations
Create a Reservation
- Before you can access the test bed, you need to make a reservation for a particular experiment server and get it approved by the reservation service.
- The reservation scheduler can be seen when you first log in to the control panel.

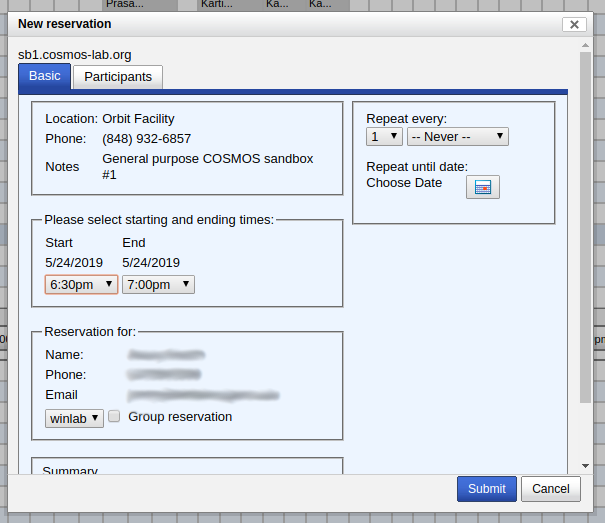
- On the scheduler, select the grid square corresponding to the subdomain you wish to reserve at the time you want the reservation to start. This will open a dialog allowing you to configure your reservation.

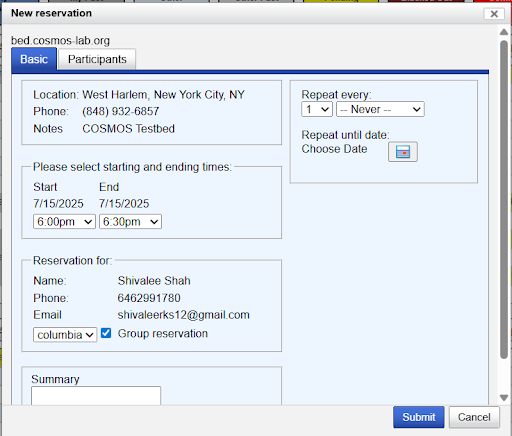
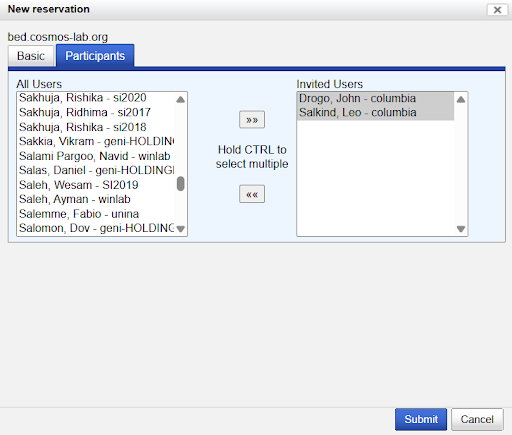
- Making a Group Reservation: There are two ways to create a group reservation:
Method 1: Use the Group Reservation tab. This will automatically grant access to all users in the group.

Method 2: Go to the Participants tab — you can manually add individual users to your reservation.

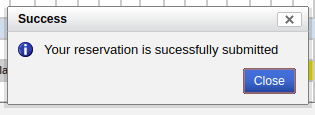
- When you are done, hit submit. You should see this popup window:

- In the scheduler, you should see your reservation appear in yellow (indicating a reservation pending approval).
- Just before your time-slot starts, it will be approved automatically.
- During the time-slot, you will be able to log in to the console.
Reservation Details
As this is a wireless testbed, it is difficult to run multiple experiments without interference. Therefore, we currently officially only support one experimenter at a time on the individual domain. In testbed speak, a domain is a set of nodes together with the controlling console which can be used to run experiments. In the present setup, the COSMOS testbed consists of a single (largest) main deployment domain in West Harlem (the bed) and an number of sandboxes i.e. domains with only small number of nodes and a console, which are development and test environments intended to reduce the time experimenters need on the main domain. Ideally, experimenters develop their software (application programs, routing protocols, measurement instrumentation, etc.) on off-site machines and then use the sandboxes for integration with the COSMOS environment/software infrastructure. Once the experiment runs successfully in the sandbox environment, it can be moved to the main testbed domain.

|
| Figure 1: Scheduler web page |
Reservations for COSMOS resources (the bed or any of the sandboxes) can be made on the Schedule page in the Control Panel. The scheduler main screen is illustrated in Figure 1.
To reserve a resource, first navigate to the table for the day you wish to make the reservation on (please note that you can advance the calendar by using navigation links at the bottom of the page; also you cannot reserve a resource for a date/time that has passed or the one for which you don't have permission). Once you have located the table for the requested day, click on the time slot you want to use as a start time of your resource reservation. This will open the form showing the detail of the reservation. Currently slot duration is limited to 2 hours per request.


After saving the reservation, the pop-up windows is closed and main scheduler table is updated with the newly created reservation slot in yellow color indicating that it is in the "pending approval" state. Also, the email notification on the reservation is sent to your registered email address.
Reservations slots are approved by the scheduling service based on the two stage approval policy. Once it has been approved, the color for that slot will be changed to dark blue and approval email notification message will be sent to the requester and requester will be able to access the console of the resource whose reservation was just approved.
Modify reservation
Once you created reservation you can modify or delete it. Just click on reservation you want to delete and pop-up window will appear similar to the one for making reservation. At the end of window Delete check box indicates that you can delete the reservation. This is possible before your reservation is approved and 15 minutes after approved reservation starts. After that you do not have possibility to delete already approved reservation.
Conflicts
It is possible to ask for a particular slot even if other user already made a reservation for it. The procedure is the same as for requesting an empty slot except that the resulting color changes to red once there are multiple simultaneous (conflicting) reservations as shown in Figure 2.

|
| Figure 2: Scheduling Conflicts |
Reservation Approval Policies
Reservation approval process is based on a two stage algorithm. In the first (pre-approval) stage, scheduling requests received before noon will be pre-approved for the following day. For example, if it is Tuesday morning before noon, and you ask for 4 to 6 in the evening Wednesday, you will know for sure whether you have this time by 2 in the afternoon on Tuesday. Users are limited to two hours a day of pre-approved time on the main grid.
For the reservations that are made less than twelve hours in advance or for ones that are more than 2 hours a day, the slots will be automatically approved at the beginning of the slot (second or just-in-time approval stage).
Conflict Resolution
Conflicts will be resolved based on how much time you've already used over the last two weeks. Those who have used less time on the main grid in the last two weeks will be more likely to have their requests approved for the conflicting slots. Exception is when user already has an approved slot. We are trying to give slots to as much people as we can during a day.
Due to complexity of the conflict resolution algorithm, please refrain from conflicting on slots that are less that 2 hours in the future since just-in-time approval process will not try to resolve conflicts.
Attachments (5)
- cosmos_success.png (9.0 KB ) - added by 7 years ago.
- cosmos_scheduler.png (36.3 KB ) - added by 7 years ago.
- cosmos_reservation.png (45.9 KB ) - added by 7 years ago.
- group_reservations.png (63.8 KB ) - added by 7 months ago.
- participants_tab.png (53.4 KB ) - added by 7 months ago.
Download all attachments as: .zip
