| Version 12 (modified by , 6 years ago) ( diff ) |
|---|
Site Navigation
Remote Access
To User account and Files
Users with an account can always access their Home Directories, and files, and run basic scripts, by connecting to ssh YOUR_USERNAME@gw.cosmos-lab.org
Detailed Instructions are at Connecting to a Console
To Consoles
The consoles can be connected to the same way as above, with the following differences:
- Consoles can be connected to only during a Getting Started.
- Consoles can run OMF commands to control Resources within their Domain
- Consoles share a Control network with Resources within their Domain
To Resources
- Resources can be interacted with by running commands from a Console.
- For example:
- Using OMF commands to
- Turn resources on/off
- Load and save images
- Run OEDL Scripts with OMF exec
- Use SSH from a console to open an interactive session with a compute resource.
- Use SSH with X11 Forwarding to view a graphical window from a resource on your local machine
Direct Access to Resources
This is an advanced topic. In the event that bridging through a console adds unacceptable overhead too your use case, the following options are available:
- Use SSH ProxyJump and similar commands to automate the connection though the console
- Use the VPN to route arbitrary network traffic from the Control Network to or from your local machine.
SSH
The most common method of connecting to the testbed is via SSH. The SSH protocol is quite powerful, and allows interactive shell sessions, file transfer, port forwarding, and even graphical display if configured properly with other utilities.
Configuring SSH Keys
[[Include(UserGuide/RemoteAccess/SshTips#Tips)]]
SSH tunneling and X11
A common need is to connect to some resource on the testbed as if it were local. SSH provides this functionality.
Select the OS of your computer
Linux & MacOS
Here, we define the following arguments:
- localuser: your username on your local machine
- localmachine: the computer that you're sitting at
- localport: a port on your local machine, accessed via localhost:localport
- testbeduser: your COSMOS username
- remotename: the resource you wish to connect to, for example, srv1-lg1.sb1.cosmos-lab.org
- consolename: the dns name of the COSMOS console you're using
The following command will allow you to access remotename:remoteport by instead accessing localmachine:localport.
This access is tunneled through the console, consolename.cosmos-lab.org, via a ssh session running under your user account, testbeduser.
localuser@localmachine:~$ ssh testbeduser@consolename.cosmos-lab.org \
-L localport:remotename:remoteport
Here's an example, tunneling two ports to two different machines. The "-N" flag only forwards the ports, without opening a remote shell.
localuser@localmachine:~$ ssh testbeduser@sb1.cosmos-lab.org -N \
-L 9980:srv1-lg1:80 \
-L 9981:srv2-lg1:80
To make permanent:
On Linux or Mac, via the terminal, make or edit a file at
~/.ssh/config by default.
Make an entry like the following, replacing the specifics as needed
Host console.sb1.cosmos-lab.org
  LocalForward 9001 srv1-lg1.sb1.cosmos-lab.org:80
Now, when you ssh to console.sb1.cosmos-lab.org, traffic that you send to localhost port 9001, will be proxied and sent to srv1-lg1.sb1.cosmos-lab.org port 80. We commonly use this to access webUIs and similar things running on a node.
Most SSH clients for other platforms have similar functionality. The important thing is to remember that the left side is your local port, and the right side is something that $HOST can talk to.
To forward an additional port, or the same port on another device, add more lines.
LocalForward 9002 srv1-lg1.sb1.cosmos-lab.org:443
LocalForward 9003 srv1-lg1.sb1.cosmos-lab.org:80
LocalForward 9004 srv3-lg1.sb1.cosmos-lab.org:9090
Just ensure that the ports on the left don't conflict.
Windows
These instructions assume that you are using PuTTY as your SSH client and have configured your SSH session according to the SSH Tutorial instructions.
Configuring PuTTY SSH Tunneling
- Configure your session login information (or load it from a saved config) first.
- Navigate through the left side menu tree to "Connection" → "SSH" → "Auth".
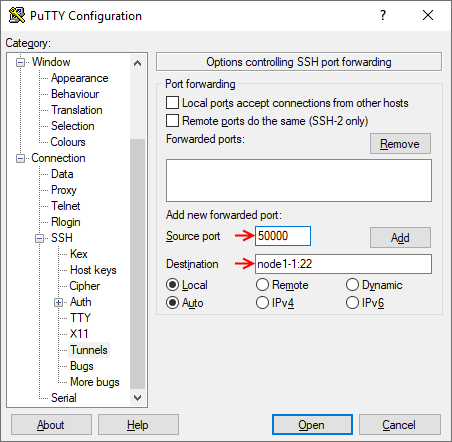
- Enter the local port you want to forward in the "Source port" field and the remote resource name (or IP address) along with the remote port in the "Destination" field (Note the colon ':' between the two). Avoid using a local port that may conflict with locally running services. In this example, the local port 50000 is forwarded to port 22 on node1-1.
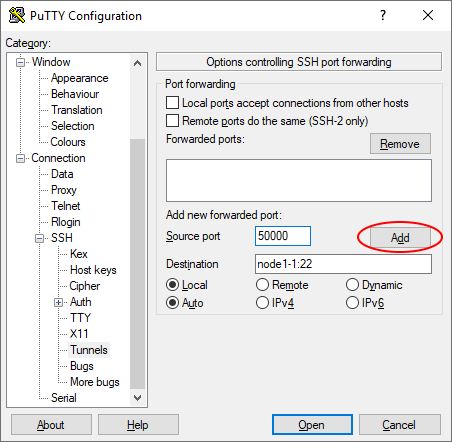
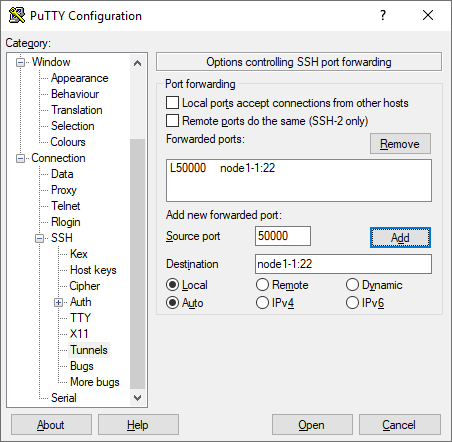
- Click "Add" to add the tunnel to the session.
- Repeat steps 2-3 for as many ports as you need to forward. Remember that each local port you use can only map to a single remote resource/port destination.
- If you click "Open", your session will start with the configured ports tunneled, but when you close the session you will have to configure the ports again. If you go back to the "Session" screen and save the settings, the port tunneling configuration will be saved for future use.
Common SSH issues
If you deleted the "@internal1" key from your profile
As long as you have at least one public key configured in your profile, use your SSH client to connect to gw.orbit-lab.org and run the following commands there. You do not need to make a reservation in the scheduler for this.
rm ~/.ssh/id_rsa
rm ~/.ssh/id_rsa.pub
ssh-keygen -t rsa -C "@internal1"
Press 'Enter' at every prompt so that the default filename (id_rsa) and no password is used.
Then type the following command:
cat ~/.ssh/id_rsa.pub >> ~/.ssh/authorized_keys
The internal key should now be restored.
Prevent unknown host key
Configure you ssh client not to use strict host key checking
For openssh, this is -o StrictHostKeyChecking=no or the same in the .config file
Using a .config file for SSH (Linux, Mac, and WSL ONLY)
We'd like to do a few things for convenience:
- log into nodes as root by default
- allow forwarding of X11 applications
- Suppress annoying host key warnings
First, log into any console, or gw.orbit-lab.org
After logging in, create or modify the file at ~/.ssh/config
Add the following to the file
Host sdr?-md* sdr?-s?-lg* srv?-co* srv?-lg* node?-* node??-*
  User root
  UserKnownHostsFile /dev/null
  StrictHostKeyChecking no
  ForwardX11 yes
- Host: The Host line matches common naming conventions for nodes within the testbed
- User: root is set to match the common default for baseline
- UserKnownHostsFile: is set to /dev/null to prevent saving new host keys for nodes
- StrictHostKeyChecking: disables the warning message. SSH complains when host keys for a dns name change. This is a useful security feature, but is inconvenient within the testbed, where the operating system on a trusted machine changes frequently. Do not set it as a wildcard default for public endpoints, or you will be vulnerable to spoofing or man in the middle attacks.
- ForwardX11: allows the forwarding of graphical applications running the X11 protocol from a node back to your machine
VPN
In cases where SSH is insufficient or inconvenient, an IPSEC VPN is available.
Common cases include:
- A need to tunnel many, or ephemeral ports.
- A need for a persistent connection joining two networks.


