Site Navigation
- COSMOS Testbed Overview
- Getting Started
- COSMOS/ORBIT User Guide
- COSMOS Portal
- Account Management
- Portal Dashboard
- Directory
- Disk Images
- Community Forum
- Getting Started with the COSMOS Portal
- SSH Access to Testbed Nodes
- Scheduler
- Testbed Status
- Installing Chrome Remote Desktop (CRD) on a Custom Image
- Tutorials
- Architecture
- Resources, Services and APIs
- Datasets
- Hardware Info
- RF Policies & Compliance
IPSec VPN
We maintain point to point connections to link various resources to the testbed, mostly at layer 2 for networking experiments. This consists of dialable links over Internet2, as well as IKEv2/IPSec tunnels over the public internet.
User VPN Service
Connect to the following endpoints using your COSMOS username and password. Your VPN connection will only be active during your approved reservation time-slots.
Testbed Domain VPN Endpoint Control Subnet Data 1 Subnet Data 2 Subnet COSMOS Main Testbed vpn.bed.cosmos-lab.org 10.110.0.0/16 10.111.0.0/16 10.112.0.0/16 COSMOS Sandbox 1 vpn.sb1.cosmos-lab.org 10.37.0.0/16 10.38.0.0/16 10.39.0.0/16 COSMOS Sandbox 2 vpn.sb2.cosmos-lab.org 10.116.0.0/16 10.117.0.0/16 10.118.0.0/16
Please be aware of the subnet specified in the table above for the testbed domain you are connecting to. If your local network shares the same IP space, there could be unforeseen problems that will be difficult to troubleshoot.
Instructions per Client OS
Windows
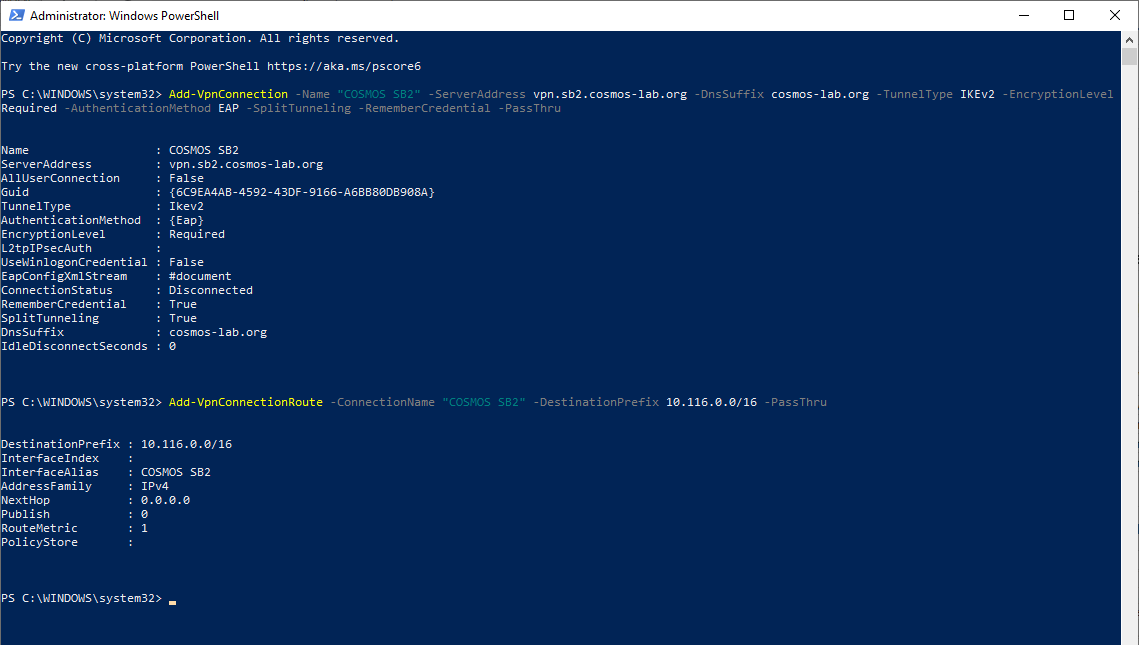
Windows PowerShell commands for specific testbed domains:
sb1.cosmos-lab.org
Add-VpnConnection -Name "COSMOS sb1" -ServerAddress vpn.sb1.cosmos-lab.org -DnsSuffix sb1.cosmos-lab.org -TunnelType IKEv2 -EncryptionLevel Required -AuthenticationMethod EAP -SplitTunneling -RememberCredential -PassThru
Add-VpnConnectionRoute -ConnectionName "COSMOS sb1" -DestinationPrefix 10.37.0.0/16 -PassThru
Add-VpnConnectionRoute -ConnectionName "COSMOS sb1" -DestinationPrefix 10.38.0.0/16 -PassThru
Add-VpnConnectionRoute -ConnectionName "COSMOS sb1" -DestinationPrefix 10.39.0.0/16 -PassThru
sb2.cosmos-lab.org
Add-VpnConnection -Name "COSMOS sb2" -ServerAddress vpn.sb2.cosmos-lab.org -DnsSuffix sb2.cosmos-lab.org -TunnelType IKEv2 -EncryptionLevel Required -AuthenticationMethod EAP -SplitTunneling -RememberCredential -PassThru
Add-VpnConnectionRoute -ConnectionName "COSMOS sb2" -DestinationPrefix 10.116.0.0/16 -PassThru
Add-VpnConnectionRoute -ConnectionName "COSMOS sb2" -DestinationPrefix 10.117.0.0/16 -PassThru
Add-VpnConnectionRoute -ConnectionName "COSMOS sb2" -DestinationPrefix 10.118.0.0/16 -PassThru
bed.cosmos-lab.org
Add-VpnConnection -Name "COSMOS Main Testbed" -ServerAddress vpn.bed.cosmos-lab.org -DnsSuffix bed.cosmos-lab.org -TunnelType IKEv2 -EncryptionLevel Required -AuthenticationMethod EAP -SplitTunneling -RememberCredential -PassThru
Add-VpnConnectionRoute -ConnectionName "COSMOS Main Testbed" -DestinationPrefix 10.110.0.0/16 -PassThru
Add-VpnConnectionRoute -ConnectionName "COSMOS Main Testbed" -DestinationPrefix 10.111.0.0/16 -PassThru
Add-VpnConnectionRoute -ConnectionName "COSMOS Main Testbed" -DestinationPrefix 10.112.0.0/16 -PassThru
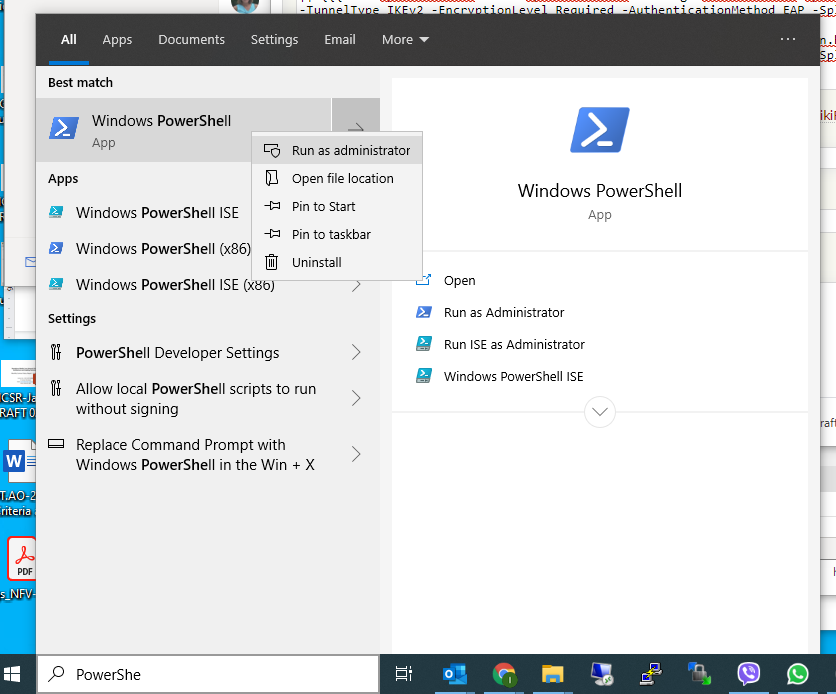
Open the PowerShell command window as administrator

Cut and paste the pair of commands into the PowerShell window as show in figure below:

Alternatively, [download the Windows PowerShell script] to your local machine, right-click on it and run it as administrator. This will create three VPN connections for the three COSMOS domains.
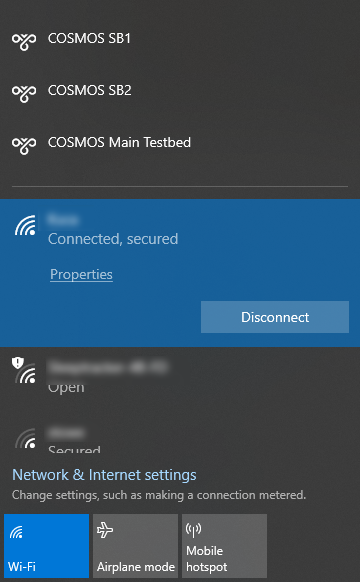
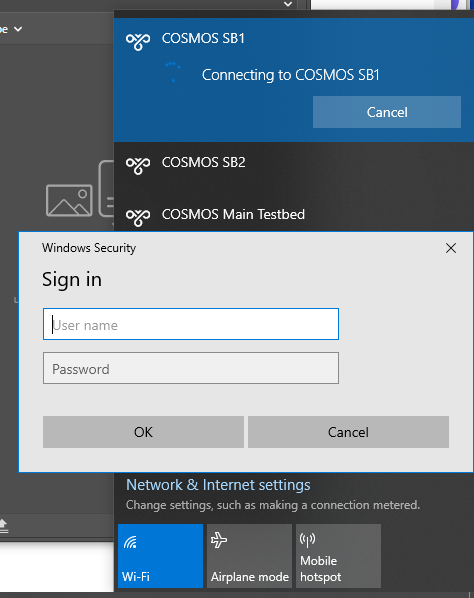
Once VPN connection(s) are created, you will be able to bring the connection menu up by left mouse click on the network icon on the Windows task bar:

Selecting the appropriate connection (for which you must have current reservation) will bring up the prompt for username and password (only the very first time that particular VPN connection is activated):

Linux (Outdated)
Instructions are provided for configuring the strongswan network manager plugin. Strongswan is an IKE daemon which can be used to set up an IPSEC tunnel. The Strongswan package is available for a variety of Linux distros, and can be configured manually through files in /etc instead of installing the network manager plugin. See this page on the strongswan wiki for examples.
These instructions are specific to Ubuntu 20.04 that no longer has long-term support, although they should be similar for other versions of Ubuntu with some configuration. Additional Linux distros which use network-manager may provide a version of the plugin through their packaging system.
To install the plugin for Debian-based distros, run apt-get install network-manager-strongswan.
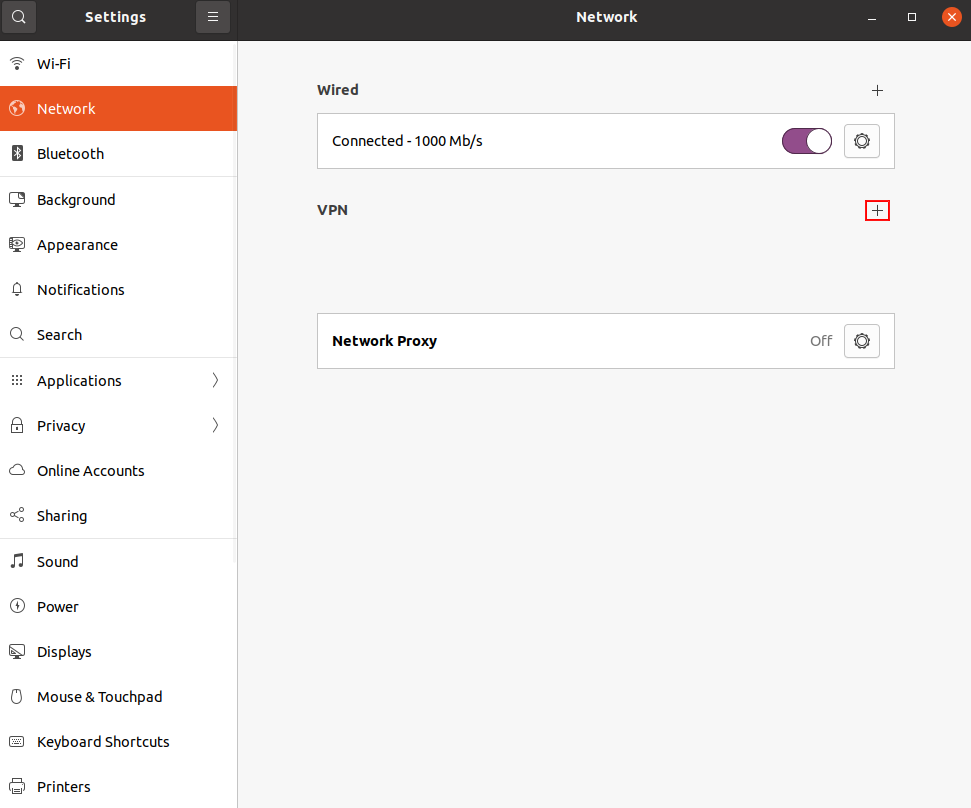
Open settings and navigate to the Network tab. Below wired connections, there should be a section for VPN connections. Select the "+" to add a new VPN connection.

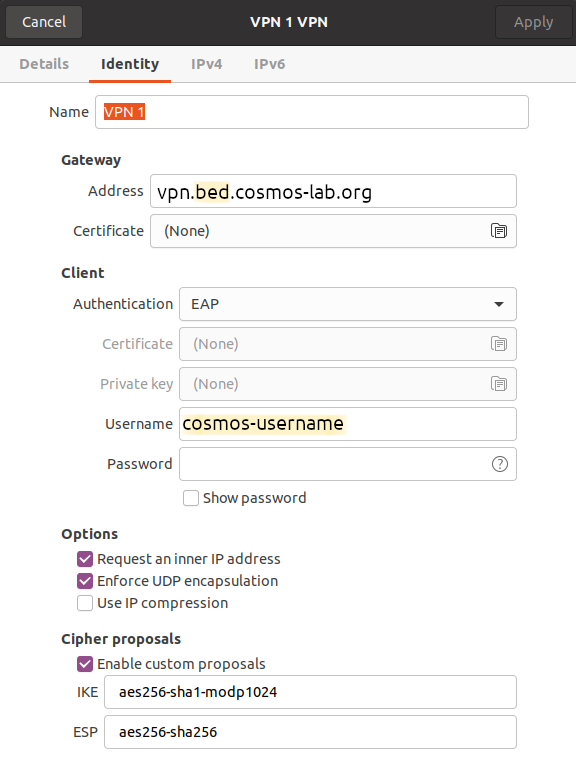
Fill in the connection information as below, making sure to use your cosmos username and select the correct domain (e.g. vpn.sb1.cosmos-lab.org)

In the IPv4 tab, you can configure manual routes or you can simply check the option to "Use this connection only for resources on its network".
The VPN can be enabled and disabled through the entry in network settings:

When you enable the vpn, you will be prompted to enter the password for your cosmos username.
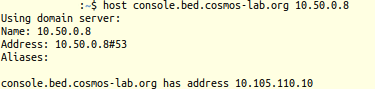
Note: there has been some difficulty with DNS resolution over the vpn connection. If you encounter this problem, please let us know. Until the issue is resolved, you can use ip addresses instead of dns names. To find the ip address of a machine, use the host utility to query the dns server located at 10.50.0.8:

MacOS
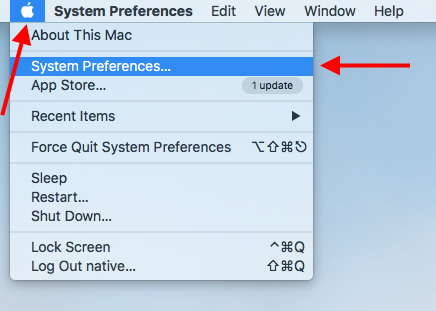
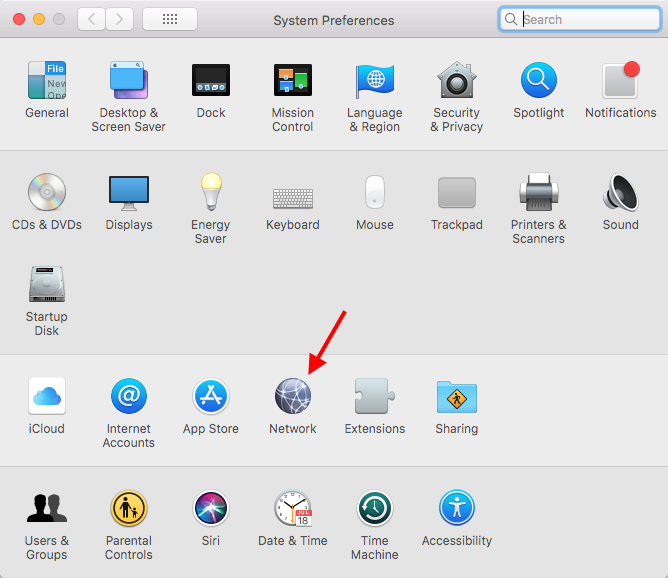
- Open "System Preferences" by clicking on the "apple logo" and selecting "System Preferences…" from the menu.

- In the "System Preferences" window, go to "Network"

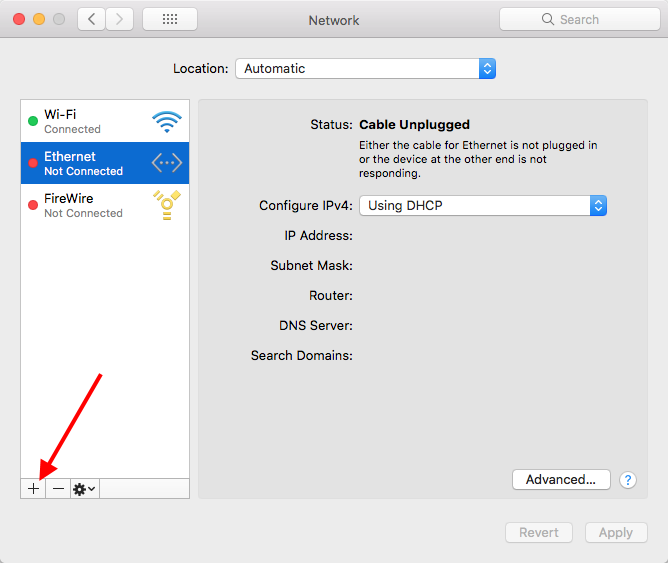
- Click the "+" button on the left hand side

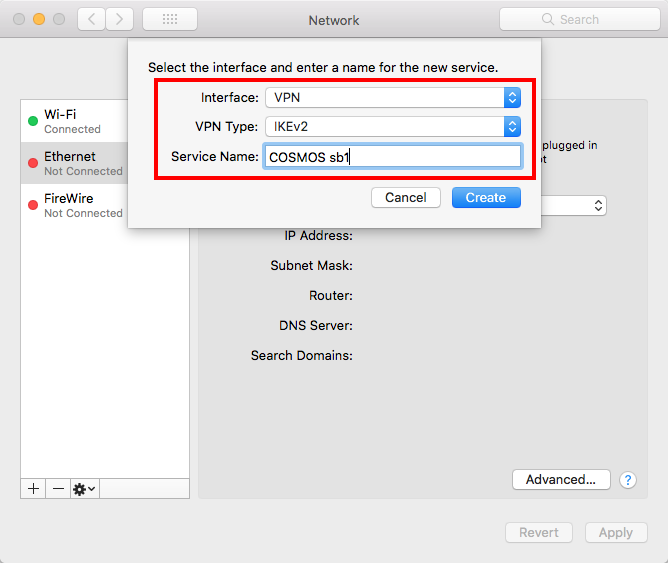
- Select "VPN" in the "Interface" drop-down and select "IKEv2" from the "VPN Type" drop-down. The "Service Name" can be anything you like (example:
COSMOS sb1). Then click "Create".

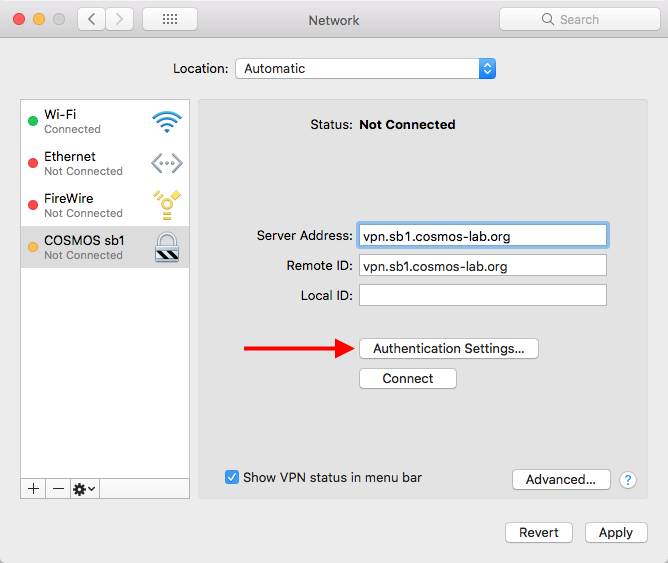
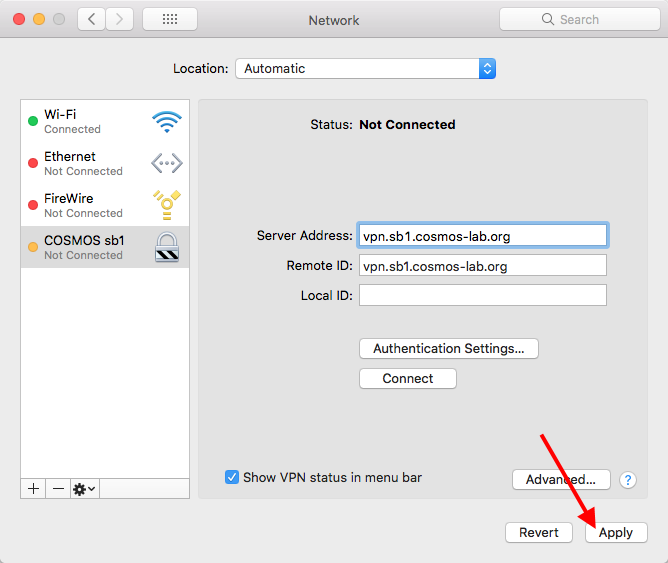
- Fill in the "Service Address" and "Remote ID" fields with the correct VPN endpoint for the specific testbed you want to connect to (example:
vpn.sb1.cosmos-lab.org). Note that the two fields must be identical.

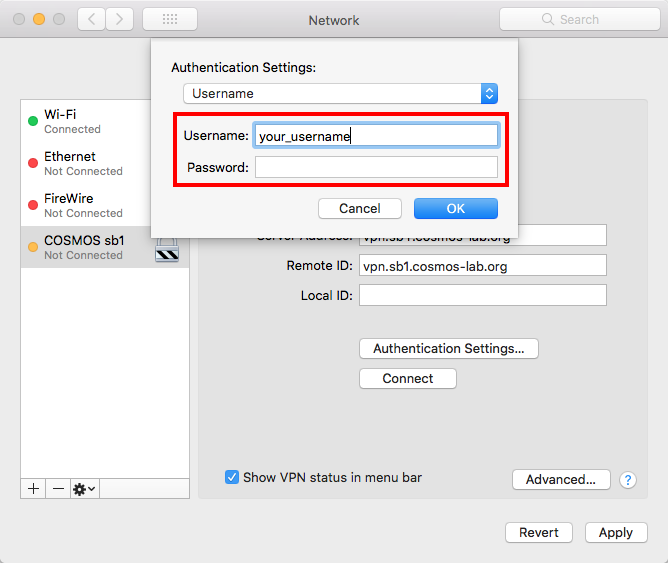
- Click "Authentication Settings…"

- Enter your COSMOS username in the "Username" field. Optionally you can also enter your COSMOS password in the "Password" field if you do not want to enter it every time you connect to the VPN. Then click "OK".

- IMPORTANT: You must click "Apply" for the VPN settings to be saved correctly.

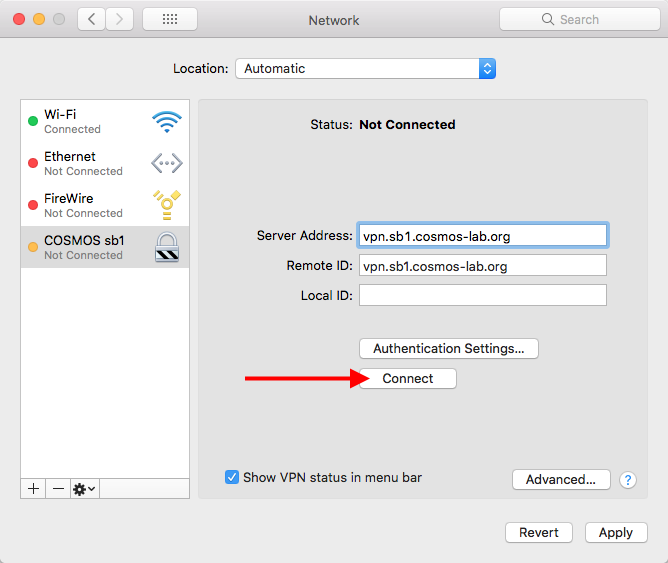
- To connect to the VPN, click "Connect".

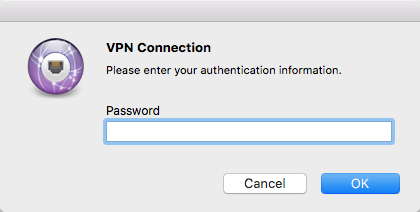
- If you did not fill in your COSMOS password in step 7, you will be asked to enter it now.

Done! You are now connected via VPN to the testbed domain.
Remember that you must have a currently approved reservation in order to use the VPN. Also, please don't forget to disconnect from the VPN when you are done.
Each testbed domain (ie. sb1.cosmos-lab.org, sb2.cosmos-lab.org, etc.) requires its own VPN configuration.
Attachments (19)
-
VPN1.png
(134.2 KB
) - added by 6 years ago.
VPN Menu
-
VPN2.png
(92.7 KB
) - added by 6 years ago.
VPN Username/Password
-
PowerShell1.png
(100.5 KB
) - added by 6 years ago.
Opening PowerShell Command Window
-
PowerShell2.png
(47.5 KB
) - added by 6 years ago.
Executing PowerShell Commands
-
COSMOS-VPN-Setup.ps1
(964 bytes
) - added by 6 years ago.
PowrShell Script for COSMOS VPN
-
settings.png
(55.7 KB
) - added by 5 years ago.
Network settings for Ubuntu
-
strongswanconfig.png
(64.0 KB
) - added by 5 years ago.
strongswan configuration for ubuntu
-
hostlookup.png
(12.7 KB
) - added by 5 years ago.
how to look up host ip address
-
vpnenable.png
(6.5 KB
) - added by 5 years ago.
How to enable vpn through ubuntu settings
- mac_vpn_01.png (95.9 KB ) - added by 5 years ago.
- mac_vpn_02.png (83.8 KB ) - added by 5 years ago.
- mac_vpn_03.png (37.7 KB ) - added by 5 years ago.
- mac_vpn_04.png (38.5 KB ) - added by 5 years ago.
- mac_vpn_05.png (39.3 KB ) - added by 5 years ago.
- mac_vpn_06.png (39.3 KB ) - added by 5 years ago.
- mac_vpn_07.png (42.4 KB ) - added by 5 years ago.
- mac_vpn_08.png (40.5 KB ) - added by 5 years ago.
- mac_vpn_09.png (39.3 KB ) - added by 5 years ago.
- mac_vpn_10.png (14.9 KB ) - added by 5 years ago.
Download all attachments as: .zip