| Version 18 (modified by , 6 years ago) ( diff ) |
|---|
Site Navigation
- COSMOS Testbed Overview
- Getting Started
- COSMOS/ORBIT User Guide
- COSMOS Portal
- Account Management
- Portal Dashboard
- Directory
- Disk Images
- Community Forum
- Getting Started with the COSMOS Portal
- SSH Access to Testbed Nodes
- Scheduler
- Testbed Status
- Installing Chrome Remote Desktop (CRD) on a Custom Image
- Tutorials
- Architecture
- Resources, Services and APIs
- Datasets
- Hardware Info
- RF Policies & Compliance
Getting Started
This guide will walk you through the steps necessary to get started with using the COSMOS testbed.
You can browse the wiki as an anonymous user. After following the steps below, you can log in using the navigation bar in the top right.
Make an Account
NOTE: If you already have an ORBIT account, you can skip this step.
Here is the account creation flow:
- Request an Account
- Select your group in the drop-down
- Specify your contact info and mailing list preference
- Reply to confirmation email for Account Request
- Defeat your spam filter by whitelisting
accountmanager@orbit-lab.org
- Defeat your spam filter by whitelisting
- Your Group PI Approves your request
- You receive confirmation email for Account Approval
First, you will need to create a user account.
If your organization is not listed and you are faculty/staff member (or project manager in eligible institution) you can create a user group for which you will be in charge (please make sure to use the email address that can be independently verified).
Usage of COSMOS is governed by the UserGuide/AcceptibleUse terms and conditions
Please note that, once you fill in the form, you will receive an email to confirm your Account Request with a link that you have to access within 30 minutes in order to fully submit the account creation request.
Step by Step Screenshots
FIXME

Create and Configure SSH Keys
SSH access to COSMOS domains requires the use of public key authentication. If you try to connect using the username and password that you use for accessing the scheduler and status pages, you will receive the following message:
not_a_user@laptop:~$ ssh not_a_user@bed.cosmos-lab.org
not_a_user@bed.cosmos-lab.org: Permission denied (publickey).
You need to configure the SSH client on your computer to use a private key for connecting to COSMOS machines instead of a password.
Additionally, the corresponding public key needs to be added to your COSMOS account.
This page describes the procedure for:
- generating a public/private key pair
- configuring your SSH client to use the private key
- uploading the public key to your COSMOS account.
The instructions here are for specific SSH client software, if you use a different SSH client than those referenced here, please follow the documentation provided with that SSH client and use the instructions here for reference.
- Select the OS of your computer
Linux
NOTE: These instructions are NOT for Ubuntu running on Windows using Windows Subsystem for Linux (WSL).
These instructions assume you will be using a standard command-line SSH client for linux. If you have not already done so, ensure that you have it installed by running the following commands in a command-line terminal:
sudo apt-get update
sudo apt-get install openssh-client
Generating keys
Each distribution has their own location for the specific generation tools. These instructions are based on the documentation for Ubuntu (located here).
To create your public and private SSH keys, open a command-line terminal and type:
ssh-keygen -t rsaYou will be prompted for a location to save the keys (you should leave this prompt empty unless you have a good reason not to), and a passphrase for the keys which we highly recommend using. This passphrase does not have to be the same as your COSMOS account password. If you generate the key with a passphrase, you will have to enter the passphrase before you can use the ssh key.
Generating public/private rsa key pair.
Enter file in which to save the key (...):
Enter passphrase (empty for no passphrase):
Enter same passphrase again:
Your identification has been saved in ...
Your public key has been saved in ...
Your public key is now available as .ssh/id_rsa.pub in your home folder.
This process will generate and store a private key and a public key file. The private key will be stored in the file and location you specify when prompted, and the public key file will be named the same as your private key file but with a .pub extension.
Uploading your public key to your COSMOS account
To upload your public key to your cosmos account, do the following:
- Go to the portal and sign in with your COSMOS username and password
- Click on the dropdown menu next to your username in the upper right corner of the page and select "SSH Keys"
- To retrieve your public key, open up a terminal, and enter
cat ~/.ssh/id_rsa.pub
- Copy the output of that command (keep in mind that you need to hold down the shift key when you are copying and pasting in a terminal) and paste it into the text box under "Upload New Key", then click the upload button.
As a side note, expect to see a default auto generated public key in the list (ends with @internal1). This is used for SSH access between machines inside the COSMOS network. Please do NOT delete this key.

Configuring your SSH client
Under normal circumstances, as long as the private key file is located in the /home/your_username/.ssh/ folder, the command line SSH client will use the correct key when connecting.
To test your setup, open a command-line terminal and (replacing your_cosmos_username with your own COSMOS username) type:
ssh your_cosmos_username@gw.orbit-lab.orgYou should be prompted to enter your key file passphrase and be able to successfully connect.
Type
exitand press the Enter key to end the SSH session.
Common issues and how to solve them
- If you receive a message like the following:
This is a normal message that occurs when your computer connects via SSH to another that it has never connected to before or if the "fingerprint" of the other machine changed (due to replacement or reconfiguration). Simply type
The authenticity of host 'gw.orbit-lab.org (128.6.192.134)' can't be established.
ECDSA key fingerprint is SHA256:iLKtq2Z8wB3ADJdEyM1CwoU85gOeqIUyB4GOJ2YloQg.
Are you sure you want to continue connecting (yes/no)?
yesand connection will proceed normally.
- If you receive a message like the following:
Try connecting again but manually specifying the location where your private SSH key is stored as in the following example:
Permission denied (publickey).ssh -i /path_to_where_key_is_stored/private_ssh_key_name your_cosmos_username@gw.orbit-lab.org
Windows
Select your SSH client:
PowerShell
These instructions assume that you are using the built-in SSH client provided in Windows PowerShell.
Generating Keys
- Open a PowerShell terminal.
- Enter the following command at the prompt:
Follow the prompts to generate your SSH key pair. For security reasons, we recommend entering a passphrase for your key. An example of the output you will see is shown below.
ssh-keygen.exePS C:\Users\local_user> ssh-keygen Generating public/private rsa key pair. Enter file in which to save the key (C:\Users\local_user/.ssh/id_rsa): Enter passphrase (empty for no passphrase): Enter same passphrase again: Your identification has been saved in C:\Users\local_user/.ssh/id_rsa. Your public key has been saved in C:\Users\local_user/.ssh/id_rsa.pub. The key fingerprint is: SHA256:/sR9z7I0dW40cKcUabv2yv7VAAkLy+snm4tpt9UW6qg local_user@local-pc The key's randomart image is: +---[RSA 3072]----+ | . . .. | | . . o .o. | | o . oo.o.| | . o+o.| | S . oo+| | S . + .o=+| | + * +.+.=| | .o.@ . +.=o| | .Eo*oo .==+| +----[SHA256]-----+
Uploading your public key to your COSMOS account
NOTE: Internet Explorer is not supported for Control Panel operations (including key upload)
To upload you public key to your cosmos account, do the following:
- Go to the portal and sign in with your COSMOS username and password
- Click on the dropdown menu next to your username in the upper right corner of the page and select "SSH Keys"
- To retrieve your public key, open up a terminal, and enter (change the filename if you saved the key in a non-default location)
cat .ssh/id_rsa.pub
- Paste the key into the text box under "Upload New Key", then click the upload button.
As a side note, expect to see a default auto generated public key in the list (ends with @internal1). This is used for SSH access between machines inside the COSMOS network. Please do NOT delete this key.
Configuring your SSH client
Under normal circumstances, as long as the private key file is located in the C:\Users\local_user\.ssh\ folder, the command line SSH client will use the correct key when connecting.
To test your setup, open a PowerShell terminal and (replacing your_cosmos_username with your own COSMOS username) type:
ssh your_cosmos_username@gw.cosmos-lab.org
You should be prompted to enter your key file passphrase and be able to successfully connect.
If necessary, you can also manually specify the path to your private SSH key as follows:
ssh -i C:\Users\local_user\.ssh\id_rsa your_cosmos_username@gw.cosmos-lab.org
Type exit and press the Enter key to end the SSH session.
Common issues and how to solve them
- If you receive a message like the following:
This is a normal message that occurs when your computer connects via SSH to another that it has never connected to before or if the "fingerprint" of the other machine changed (due to replacement or reconfiguration). Simply type
The authenticity of host 'gw.orbit-lab.org (128.6.192.134)' can't be established.
ECDSA key fingerprint is SHA256:iLKtq2Z8wB3ADJdEyM1CwoU85gOeqIUyB4GOJ2YloQg.
Are you sure you want to continue connecting (yes/no)?
yesand connection will proceed normally.
- If you receive a message like the following:
Try connecting again but manually specifying the location where your private SSH key is stored as in the following example:
Permission denied (publickey).ssh -i /path_to_where_key_is_stored/private_ssh_key_name your_cosmos_username@gw.orbit-lab.org
PuTTY
These instructions assume that you are using PuTTY as your SSH client.
Generating Keys
In PuTTY, the key generation is handled by a separate program named puttygen.exe. If you installed PuTTY via the installer, there should be an icon for PuTTYgen in your Start menu, otherwise download it from here.
- Open PuTTYgen
- Click the "Generate" button and follow the instructions in the "Key" section of the window


- Type a passphrase of your choice in the "Key passphrase" and "Confirm passphrase" fields. This passphrase does not have to be the same as your COSMOS account password.

- Click the "Save private key" button

- Save the private key file somewhere you will remember on your computer. Do not share this key with anyone!
- After saving the private key file, right-click in the big text box labeled "Public key for pasting into OpenSSH authorized_keys file" and click "Select All" from the popup menu to highlight the entire public key

- Right-click again in the same big box and click "Copy" from the popup menu

- Open Notepad from your Start menu
- Paste what you just copied from PuTTYgen into Notepad. The contents should start with
ssh-rsaand end with something likersa-key-20180621(the same as the "Key comment" field in PuTTYgen)
- Save this file somewhere you will remember on your computer. This is your public key file.
- Close PuTTYgen
Uploading your public key to you COSMOS account
NOTE: Internet Explorer is not supported for Control Panel operations (including key upload)
To upload your public key to your cosmos account, do the following:
- Go to the portal and sign in with your COSMOS username and password
- Click on the dropdown menu next to your username in the upper right corner of the page and select "SSH Keys"
- Open the public key file that you saved, and copy the contents.
- Paste the key into the text box under "Upload New Key", then click the upload button.
As a side note, expect to see a default auto generated public key in the list (ends with @internal1). This is used for SSH access between machines inside the COSMOS network. Please do NOT delete this key.
Configuring your SSH client
- Open PuTTY.

- Navigate through the left side menu tree to "SSH" then "Auth".

- Click the "Browse" button next to the "Private key file for authentication" field.

- Navigate to where you saved your private key file in the previous section and select it.
- Navigate through the left side menu tree back to "Session".

- Enter a name for this connection in the "Saved Sessions" field and click the "Save" button.

- Now whenever you open PuTTY, select the session name you gave in the previous step and click "Load", this will load the private key file automatically so you do not have to repeat the prior steps each time (as long as you do not move it to a different folder on your computer).

- Type
your_cosmos_username@gw.orbit-lab.org(replacing your_cosmos_username with your own COSMOS username) into the "Host Name (or IP address)" field and click the "Open" button. You should be prompted to enter your key file passphrase and be able to successfully connect.

- Type
exitand press the Enter key to end the SSH session.
Common issues and how to solve them
If you receive a message like the following:
The authenticity of host 'gw.orbit-lab.org (128.6.192.134)' can't be established.
ECDSA key fingerprint is SHA256:iLKtq2Z8wB3ADJdEyM1CwoU85gOeqIUyB4GOJ2YloQg.
Are you sure you want to continue connecting (yes/no)?
or

This is a normal message that occurs when your computer connects via SSH to another that it has never connected to before or if the "fingerprint" of the other machine changed (due to replacement or reconfiguration). Simply type
yesor click "Yes" and connection will proceed normally.
Mac
Mac OS has a native command line ssh client that can be used to remotely log into consoles. From the Finder select Applications → Utilities → Terminal to open a command line terminal.
Generating keys
Generate the public and private keys using the following command
ssh-keygen -t rsa
Follow the prompt to save the keys in the default location, use a passphrase for additional security. Once your keys are saved successfully, a 'randomart' will be generated.
your_username@Macintrash ~ % ssh-keygen -t rsa -C mac
Generating public/private rsa key pair.
Enter file in which to save the key (/Users/your_username/.ssh/id_rsa):
Created directory '/Users/your_username/.ssh'.
Enter passphrase (empty for no passphrase):
Enter same passphrase again:
Your identification has been saved in /Users/your_username/.ssh/id_rsa.
Your public key has been saved in /Users/your_username/.ssh/id_rsa.pub.
The key fingerprint is:
SHA256:sclFUKMVPUAUBEk+Qa3MZhLv3qfo/BWY+B5huCajS5U mac
The key's randomart image is:
+---[RSA 2048]----+
|       o*X%=     |
|      ...=..o    |
|       ==..  .   |
|      .oBO o     |
|      E=S = .    |
|     .  .+ . .   |
|    . o.o.o .    |
|   . . =.o.o.    |
|    o. .+.+o     |
+----[SHA256]-----+
Uploading your public key to you COSMOS account
To upload you public key to your cosmos account, do the following:
- Go to the portal and sign in with your COSMOS username and password
- Click on the dropdown menu next to your username in the upper right corner of the page and select "SSH Keys"
- To retrieve your public key, open up a terminal, and enter
cat ~/.ssh/id_rsa.pub
- Copy the output of that command (keep in mind that you need to hold down the shift key when you are copying and pasting in a terminal) and paste it into the text box under "Upload New Key", then click the upload button.
As a side note, expect to see a default auto generated public key in the list (ends with @internal1). This is used for SSH access between machines inside the COSMOS network. Please do NOT delete this key.
Configuring your SSH client
Under normal circumstances, as long as the private key file is located in the /Users/your_username/.ssh/ folder, the command line SSH client will use the correct key when connecting.
To test your setup, open a command-line terminal and (replacing your_orbit_username with your own ORBIT username) type:
ssh your_orbit_username@gw.orbit-lab.orgYou should be prompted to enter your key file passphrase and be able to successfully connect.
Type
exitand press the Enter key to end the SSH session.
Common issues and how to solve them
- If you receive a message like the following:
This is a normal message that occurs when your computer connects via SSH to another that it has never connected to before or if the "fingerprint" of the other machine changed (due to replacement or reconfiguration). Simply type
The authenticity of host 'gw.orbit-lab.org (128.6.192.134)' can't be established.
ECDSA key fingerprint is SHA256:iLKtq2Z8wB3ADJdEyM1CwoU85gOeqIUyB4GOJ2YloQg.
Are you sure you want to continue connecting (yes/no)?
yesand connection will proceed normally.
- If you receive a message like the following:
Try connecting again but manually specifying the location where your private SSH key is stored as in the following example:
Permission denied (publickey).ssh -i /path_to_where_key_is_stored/private_ssh_key_name your_cosmos_username@gw.orbit-lab.org
Make a Reservation
- Before you can access the test bed, you need to make a reservation for a particular experiment server and get it approved by the reservation service.
- The reservation scheduler can be seen when you first log in to the control panel.
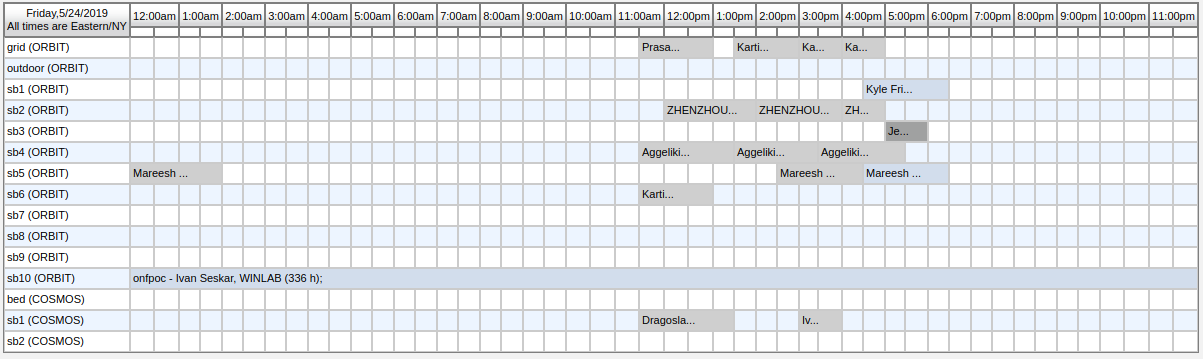
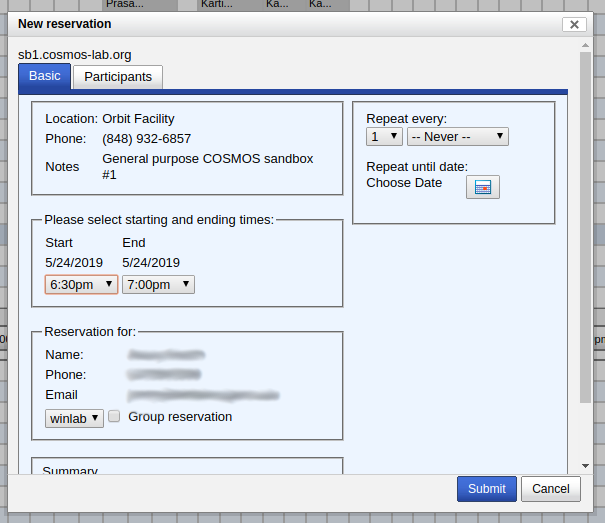
- On the scheduler, select the grid square corresponding to the subdomain you wish to reserve at the time you want the reservation to start. This will open a dialog allowing you to configure your reservation.
- Making a Group Reservation: There are two ways to create a group reservation:


Method 1: Use the Group Reservation tab. This will automatically grant access to all users in the group.

Method 2: Go to the Participants tab — you can manually add individual users to your reservation.

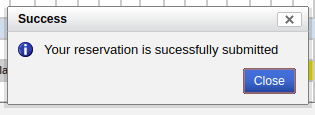
- When you are done, hit submit. You should see this popup window:
- In the scheduler, you should see your reservation appear in yellow (indicating a reservation pending approval).
- Just before your time-slot starts, it will be approved automatically.
- During the time-slot, you will be able to log in to the console.

Log in to your Reservation
During your approved time slot, you will be able to ssh into the console of the respective domain. A console is a dedicated machine that allows access to all resources in that domain.
not_a_user@laptop:~$ ssh your_username@console.sb1.cosmos-lab.org
                                       Welcome to
   _____ ____   _____ __  __  ____   _____      _               ____
  / ____/ __ \ / ____|  \/  |/ __ \ / ____|    | |        /\   |  _ \
 | |   | |  | | (___ | \  / | |  | | (___ _____| |       /  \  | |_) | ___  _ __ __ _
 | |   | |  | |\___ \| |\/| | |  | |\___ \_____| |      / /\ \ |  _ < / _ \| '__/ _` |
 | |___| |__| |____) | |  | | |__| |____) |    | |____ / ____ \| |_) | (_) | | | (_| |
  \_____\____/|_____/|_|  |_|\____/|_____/     |______/_/    \_\____(_)___/|_|  \__, |
                                                                                 __/ |
                                                                                |___/
 Hostname         : console.sb1.cosmos-lab.org
 Operating system : Ubuntu 16.04.5 LTS; Kernel: 4.15.0-45-generic; Arch: x86_64;
 CPU              : 6 x Intel(R) Xeon(R) CPU E5-2630 v2 @ 2.60GHz
                    1 socket(s) with 6 core(s) per socket and 1 thread(s) per core
 Memory           : 3.9G
 Uptime           : up 5 weeks, 1 day, 19 hours, 28 minutes
 Users logged in  : 13
Last login: Thu May 16 10:18:10 2019 from 192.168.203.237
your_username@console:~$
Control Resources with OMF
Get the status of nodes
user@console:~$ omf status

Returns the status of the nodes in a testbed.

Usage:
omf stat [-h] -t TOPOLOGY [-h] [-s] [-c AGGREGATE]}}}

Arguments:

-h, --help                 print this help message
-t, --topology TOPOLOGY    a valid topology file or description (MANDATORY)
-s, --summary              print a summary of the node status for the testbed
-c, --config AGGREGATE     use testbed AGGREGATE
Examples:
Get the status of all nodes in the testbed. This is good way to find all the FQDN of the nodes in the console.
omf stat -t all
Get the status of a single node.
omf stat -t sdr2-md1.bed.cosmos-lab.org
Get the status of multiple nodes. Use a comma-separate list to specify multiple nodes in the topology (no space before or after the comma).
omf stat -t sdr2-md1.bed.cosmos-lab.org,srv1-co1.bed.cosmos-lab.org
Load an image onto the node
user@console:~$ omf load
Install a given disk image on the nodes in a testbed.

Usage:
omf load [-h] -t TOPOLOGY [-i IMAGE_PATH] [-o TIMEOUT] [-c AGGREGATE]}}}

Arguments:

-h, --help                 print this help message
-t, --topology TOPOLOGY    a valid topology file or description (MANDATORY)
                           (if a file 'TOPOLOGY' doesn't exist, interpret it as a
                           comma-separated list of nodes)
-i, --image IMAGE          disk image to load
                           (default is 'baseline.ndz', the latest stable baseline image)
-c, --config AGGREGATE     use testbed AGGREGATE
-o, --timeout TIMEOUT      a duration (in sec.) after which imageNodes should stop waiting for
                           nodes that have not finished their image installation
                           (default is 800 sec, i.e. 13min 20sec)
-r, --resize SIZE          Resizes the first partition to SIZE GB or to maximum size if SIZE=0 or
                           leave x percent of free space if SIZE=x%
  --outpath PATH           Path where the resulting Topologies should be saved
                           (default is '/tmp')
  --outprefix PREFIX       Prefix to use for naming the resulting Topologies
                           (default is your experiment ID)
Examples:
Load the default baseline image (baseline.ndz) on all nodes in the testbed.
omf load -t system:topo:all -i baseline.ndz
Load a specific image (my_image.ndz) on all nodes in a topology.
omf load -t system:topo:all -i my_image.ndz
Load a specific image (my_image.ndz) onto a single node.
omf load -t sdr2-md1.bed.cosmos-lab.org -i my_image.ndz
Load a specific image (my_image.ndz) onto multiple nodes with a timeout of 400 seconds.
omf load -t sdr2-md1.bed.cosmos-lab.org,srv1-co1.bed.cosmos-lab.org -i my_image.ndz -o 400
Turn the node on
user@console:~$ omf tell

Switch ON/OFF and reboot the nodes in a testbed.

Usage:
omf tell [-h] -t TOPOLOGY -a ACTION [-c AGGREGATE]}}}

Arguments:
-h, --help                 print this help message
-a, --action ACTION        specify an ACTION:
                           on          turn node(s) ON
                           offs        turn node(s) OFF (soft)
                           offh        turn node(s) OFF (hard)
                           reboot      reboots node(s) (soft)
                           reset       resets node(s) (hard)
-t, --topology TOPOLOGY    a valid topology file or description (MANDATORY)
-c, --config AGGREGATE     use testbed AGGREGATE
Examples:
Reset (soft) a node.
omf tell -a reset -t sdr2-md1.bed.cosmos-lab.org
Reboot (hard) a node.
omf tell -a reboot -t sdr2-md1.bed.cosmos-lab.org
Turn on multiple nodes.
omf tell -a on -t sdr2-md1.bed.cosmos-lab.org,srv1-co1.bed.cosmos-lab.org
Turn offh (hard) multiple nodes.
omf tell -a offh -t sdr2-md1.bed.cosmos-lab.org,srv1-co1.bed.cosmos-lab.org
Log into the node and make changes
TODO
Save the node with your changes
Once you have the image prepared the way you want it. You need to run the following script on the node:
root@srv1-lg1.sb1.orbit-lab.org: /root/prepare.sh
This will remove udev rules (to prevent renaming of interfaces) and dump log files to lower the size of the image. It will also shutdown the node.
Once the node has been shutdown, to save the existing disk image use the command:
user@console:~$ omf save

Save a disk image from a given node into an archive file.

Usage:
omf save -n NODE [-h] [-c AGGREGATE]}}}


Arguments:
-h, --help           print this help message
-n, --node NODE      a valid description of a single node (MANDATORY)
                     (no default here, you have to enter a node!)
-r, --resize SIZE    Resizes the first partition to SIZE GB or to maximum size if SIZE=0 or
                     leave x percent of free space if SIZE=x%
NODE must be specified in FQDN (fully qualified domain name) format (eg. srv1-lg1.sb2.cosmos-lab.org).
Examples:
Save the disk image from a node.
omf save -n srv1-lg1.sb2.cosmos-lab.org
Example of Output
Once you have the image prepared the way you want it. On the node run:
console:~$ ssh root@sdr2-lg1.sb1.cosmos-lab.org
root@sdr-console: ./prepare.sh
This will remove udev rules (to prevent renaming of interfaces) and dump log files to lower the size of the image. It also shutdown the node.
Once the node has been shutdown, to save the existing disk image running on the node, use the omf save command on the console:
console:~$ omf save -n sdr2-lg1.sb1.cosmos-lab.org
The output of this image saving process will look like the following:
INFO NodeHandler: OMF Experiment Controller 5.4 (git c005675)
INFO NodeHandler: Slice ID: pxe_slice
INFO NodeHandler: Experiment ID: pxe_slice-2013-02-06t14.14.46-05.00
INFO NodeHandler: Message authentication is disabled
INFO Experiment: load system:exp:stdlib
INFO property.resetDelay: resetDelay = 230 (Fixnum)
INFO property.resetTries: resetTries = 1 (Fixnum)
INFO Experiment: load system:exp:eventlib
INFO Experiment: load system:exp:saveNode
INFO property.node: node = "node1-1.sb1.orbit-lab.org" (String)
INFO property.pxe: pxe = "1.1.6" (String)
INFO property.domain: domain = "grid.orbit-lab.org" (String)
INFO property.started: started = "false" (String)
INFO property.image: image = nil (NilClass)
INFO property.resize: resize = nil (NilClass)
WARN exp: Saving only works for ext2/ext3 partitions and MBR (msdos) partition tables. Saving any other filesystem or partition table type will produce a 0 byte image.
INFO Topology: Loading topology 'node1-1.sb1.orbit-lab.org'.
INFO Experiment: Resetting resources
INFO stdlib: Waiting for nodes (Up/Down/Total): 0/1/1 - (still down: node1-1.sb1.orbit-lab.org) [0 sec.]
.
.
.
INFO stdlib: Waiting for nodes (Up/Down/Total): 0/1/1 - (still down: node1-1.sb1.orbit-lab.org) [80 sec.]
INFO ALL_UP: Event triggered. Starting the associated tasks.
INFO node1-1.sb1.orbit-lab.org:
INFO node1-1.sb1.orbit-lab.org: - Saving image of '/dev/sda' on node 'node1-1.sb1.orbit-lab.org'
INFO node1-1.sb1.orbit-lab.org:   to the file 'bob-node-node1-1.sb1.orbit-lab.org-2013-02-06-14-16-23.ndz' on host '10.10.0.42'
INFO node1-1.sb1.orbit-lab.org:
INFO property.started: started = "true" (String)
INFO exp:
INFO exp: - Saving process started at: Wed Feb 06 14:16:27 -0500 2013
INFO exp:   (this may take a while depending on the size of your image)
INFO Experiment: DONE!
INFO ExecApp: Application 'commServer' finished
INFO run: Experiment sb1_2008_07_20_23_38_04 finished after 9:19
done.
Please make sure that the process ends without errors.
If there are no errors, at the end of the saving process, you will have disk image file with the name:
bob-node-sdr2-lg1.sb1.cosmos-lab.org-2013-02-06-14-16-23.ndz
in the directory
/export/omf/omf-images
This directory is available on each console, as well as the machine with the host name "frisbee". This information is printed in the output shown above.
You can then reload this disk image on a node (or nodes) using the omf load command.
Run a Hello World Experiment
user@console:~$ omf exec

Execute an experiment script.

Usage:
exec [OPTIONS] ExperimentName [-- EXP_OPTIONS]}}}

!ExperimentName is the filename of the experiment script

[EXP_OPTIONS] are any options defined in the experiment script

[OPTIONS] are any of the following:
-a, --allow-missing              Continue experiment even if some nodes did not check in
-c, --config NAME                Configuration section from the config file ('default' if omitted)
-C, --configfile FILE            File containing local configuration parameters
-d, --debug                      Operate in debug mode
-i, --interactive                Run the experiment controller in interactive mode
-l, --libraries LIST             Comma separated list of libraries to load (defaults to [system:exp:stdlib,system:exp:eventlib,system:exp:winlib])
--log FILE                       File containing logging configuration information
-m, --message MESSAGE            Message to add to experiment trace
-n, --just-print                 Print the commands that would be executed, but do not execute them
-N, --no-am                      Don't use the Aggregate Manager (AM)
-p, --print URI                  Print the contents of the experiment script
-o, --output-result FILE         File to write final state information to
-e, --experiment-id EXPID        Set the ID for this experiment, instead of the default standard ID
-O, --output-app                 Display STDOUT & STDERR output from the executed applications
-r, --reset                      If set, then reset (reboot) the nodes before the experiment
-s, --shutdown                   If set, then shut down resources at the end of an experiment
-S, --slice NAME                 Name of the Slice where this EC should operate
-t, --tags TAGS                  Comma separated list of tags to add to experiment trace
--oml-uri URI                    The URI to the OML server for this experiment
-x, --extra-libs LIST            Comma separated list of libraries to load in addition to [system:exp:stdlib,system:exp:eventlib,system:exp:winlib]
--slave-mode EXPID               Run in slave mode in disconnected experiment, EXPID is the exp. ID
--slave-mode-resource NAME       When in slave mode, NAME is the HRN of the resource for this EC
-h, --help                       Show this message
-v, --version                    Show the version
Get Help and Support
COSMOS Wiki
Many of our users' most common questions have documented answers in this wiki. Please use the search function in the top-right corner.
Frequently Asked Questions
Many issues are very common, please refer to the FAQ
How to request help
In order to best solve your issues, please include the following in your communication:
- Institutional Affiliation
- email and username used for account registration
- brief description of your issue
- what you were trying to accomplish
- what did not work as you expected
- any other relevant information such as:
- the commands you ran, and their output
- error messages
- log files
Community Mailing List
To ask questions of the user community, use the mailing list orbit-users@orbit-lab.org
Technical Support
To get technical support from the testbed maintainers, email problems@cosmos-lab.org