Site Navigation
- COSMOS Testbed Overview
- Getting Started
- COSMOS/ORBIT User Guide
- COSMOS Portal
- Account Management
- Portal Dashboard
- Directory
- Disk Images
- Community Forum
- Getting Started with the COSMOS Portal
- SSH Access to Testbed Nodes
- Scheduler
- Testbed Status
- Installing Chrome Remote Desktop (CRD) on a Custom Image
- Tutorials
- Architecture
- Resources, Services and APIs
- Datasets
- Hardware Info
- RF Policies & Compliance
GNURadio OFDM tutorial
Description
This tutorial illustrates the use of GNURadio OFDM blocks for data transfer between a pair of USRPs. The GNURadio flowgraphs used here were obtained from the workshop material provided for POWDER-RENEW Mobile and Wireless Week 2019. They are based on the GRC examples available in the GNURadio repository. For a good understanding of the flowgraphs and the blocks, please refer to OFDM pages on GNURadio Wiki such as OFDM Basics and OFDM Synchronization.
Prerequisites
In order to access the test bed, create a reservation and have it approved by the reservation service. Access to the resources is granted after the reservation is confirmed. Please follow the process shown on the COSMOS getting started page to get started.
Resources required
2 USRPs in COSMOS or ORBIT testbed, and 2 host nodes are required. This tutorial uses sb2.orbit-lab.org with 2 host nodes and 2 USRP X310s.
Tutorial Setup
Follow the steps below to gain access to the sandbox 2 console and set up nodes with appropriate images.
- If you don't have one already, sign up for a COSMOS account
- Create a resource reservation on sandbox 2 (ORBIT)
- Login into sandbox 2 console (console.sb2.orbit-lab.org) with an SSH session. SSH session for ORBIT SB2 with Moba Xterm can be setup as shown in the Fosphor tutorial, with remote host = console.sb2.orbit-lab.org, and username = your COSMOS username. X11 forwarding is enabled to access GUI.
- Load hari_OFDM.ndz on both the nodes
omf load -i hari_OFDM.ndz -t node1-1,node1-2
- Turn the nodes on and check the status
omf tell -a on -t node1-1,node1-2
omf stat -t all
- Open 2 terminal sessions and ssh into the nodes with -Y for X11 forwarding
ssh root@node1-1 -Y
ssh root@node1-2 -Y
Experiment Execution
Find the USRPs
- As mentioned in the sb2.orbit page, the X310s have their port 1 directly connected to their respective nodes, and the IP addresses hardcoded to 192.168.40.2 as given in the X310 manual. To access the X310s run eth_config_sb2_orbit.sh on both the nodes. It sets a static IP address 192.168.40.1 on the DATA2 interface, and modifies the maximum send and receive socket buffer sizes.
root@node1-2:~# ./eth_config_sb2_orbit.sh
net.core.wmem_max = 25000000
net.core.rmem_max = 25000000
root@node1-2:~# ip addr show DATA2
4: DATA2: <BROADCAST,MULTICAST,UP,LOWER_UP> mtu 9000 qdisc mq state UP group default qlen 1000
    link/ether f4:52:14:83:af:80 brd ff:ff:ff:ff:ff:ff
    inet 192.168.40.1/24 scope global DATA2
       valid_lft forever preferred_lft forever
    inet6 fe80::f652:14ff:fe83:af80/64 scope link
       valid_lft forever preferred_lft forever
- Run uhd_find_devices and uhd_usrp_probe to detect the X310s and to make sure they have a compatible firmware installed.
root@node1-2:~# uhd_find_devices
[INFO] [UHD] linux; GNU C++ version 9.4.0; Boost_107100; UHD_4.4.0.0-0ubuntu1~focal1
--------------------------------------------------
-- UHD Device 0
--------------------------------------------------
Device Address:
    serial: 30F10F9
    addr: 192.168.40.2
    fpga: XG
    name:
    product: X310
    type: x300

root@node1-2:~# uhd_usrp_probe --args="addr=192.168.40.2"
[INFO] [UHD] linux; GNU C++ version 9.4.0; Boost_107100; UHD_4.4.0.0-0ubuntu1~focal1
[INFO] [X300] X300 initialization sequence...
[INFO] [X300] Maximum frame size: 8000 bytes.
[INFO] [GPS] No GPSDO found
[INFO] [X300] Radio 1x clock: 200 MHz
  _____________________________________________________
 /
|       Device: X-Series Device
|     _____________________________________________________
|    /
|   |       Mboard: X310
|   |   revision: 8
|   |   revision_compat: 7
|   |   product: 30818
.
.
.
.
|   |    /
|   |   |       RX Frontend: 0
|   |   |   Name: UBX RX
|   |   |   Antennas: TX/RX, RX2, CAL
|   |   |   Sensors: lo_locked
|   |   |   Freq range: 10.000 to 6000.000 MHz
|   |   |   Gain range PGA0: 0.0 to 31.5 step 0.5 dB
|   |   |   Bandwidth range: 160000000.0 to 160000000.0 step 0.0 Hz
|   |   |   Connection Type: IQ
|   |   |   Uses LO offset: No
In case of firmware mismatch, follow the directions displayed in the error message and use uhd_image_loader to update the firmware.
Run the GRC application
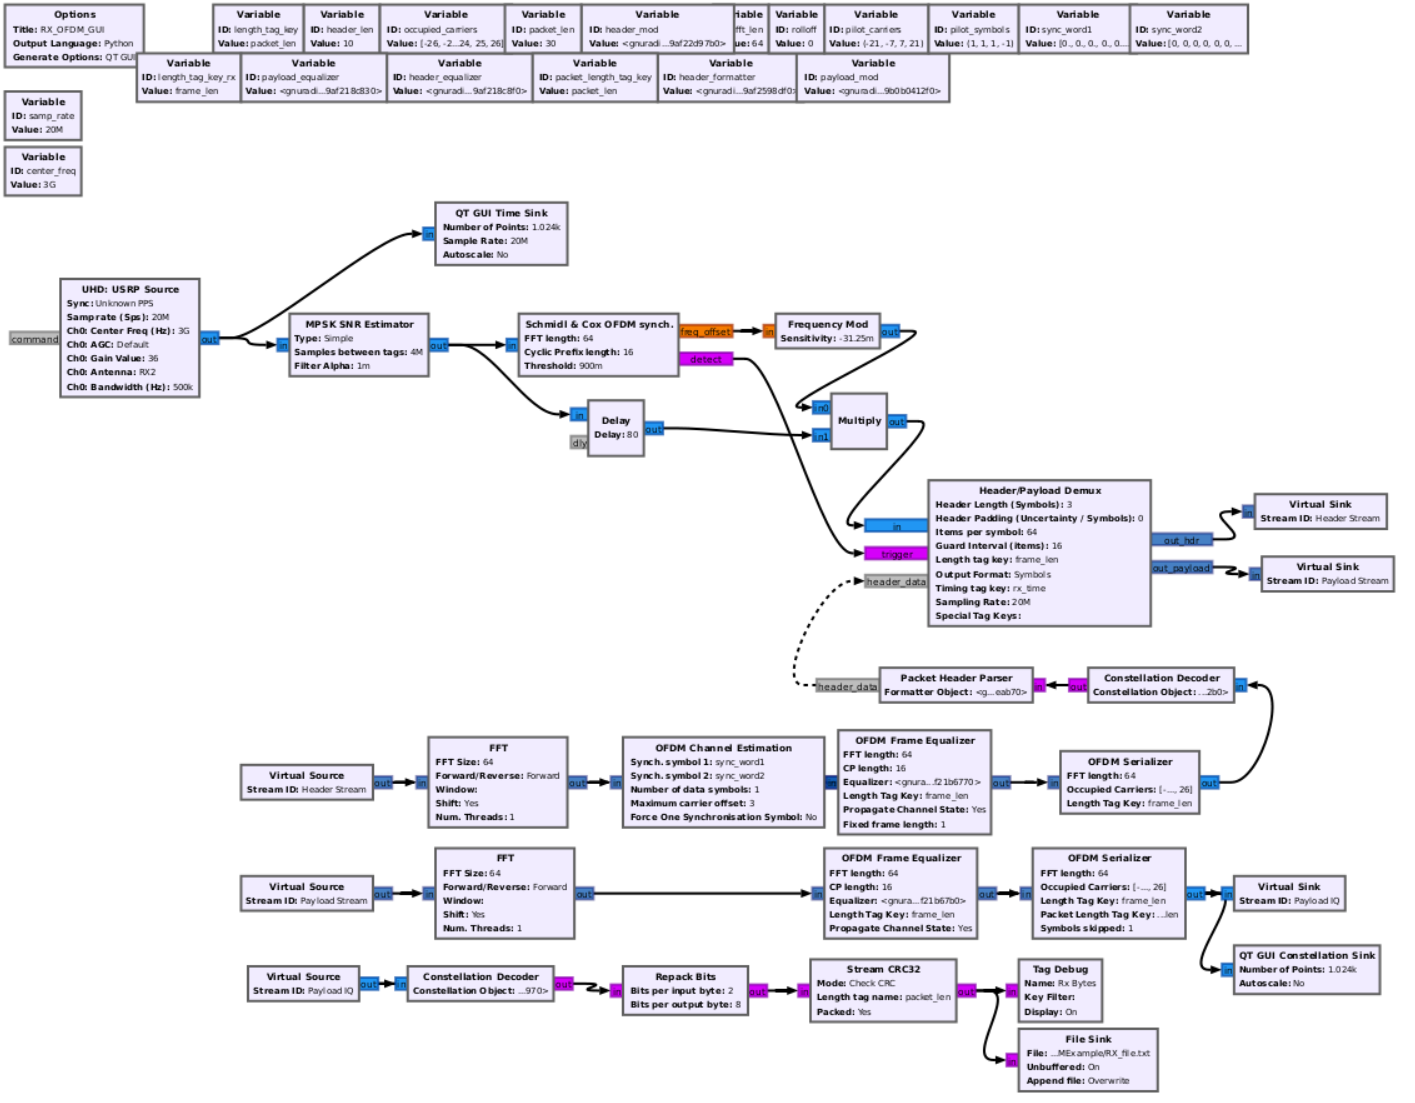
- Open OFDM receiver on node1-2. With X11 forwarding enabled, GRC should show up as below.
root@node1-2:~# cd GNURadioOFDMExample/ root@node1-2:~/GNURadioOFDMExample# gnuradio-companion RX_OFDM.grc <<< Welcome to GNU Radio Companion 3.9.8.0 >>> Block paths: /usr/local/share/gnuradio/grc/blocks Loading: "/root/GNURadioOFDMExample/RX_OFDM.grc" >>> Done |
|

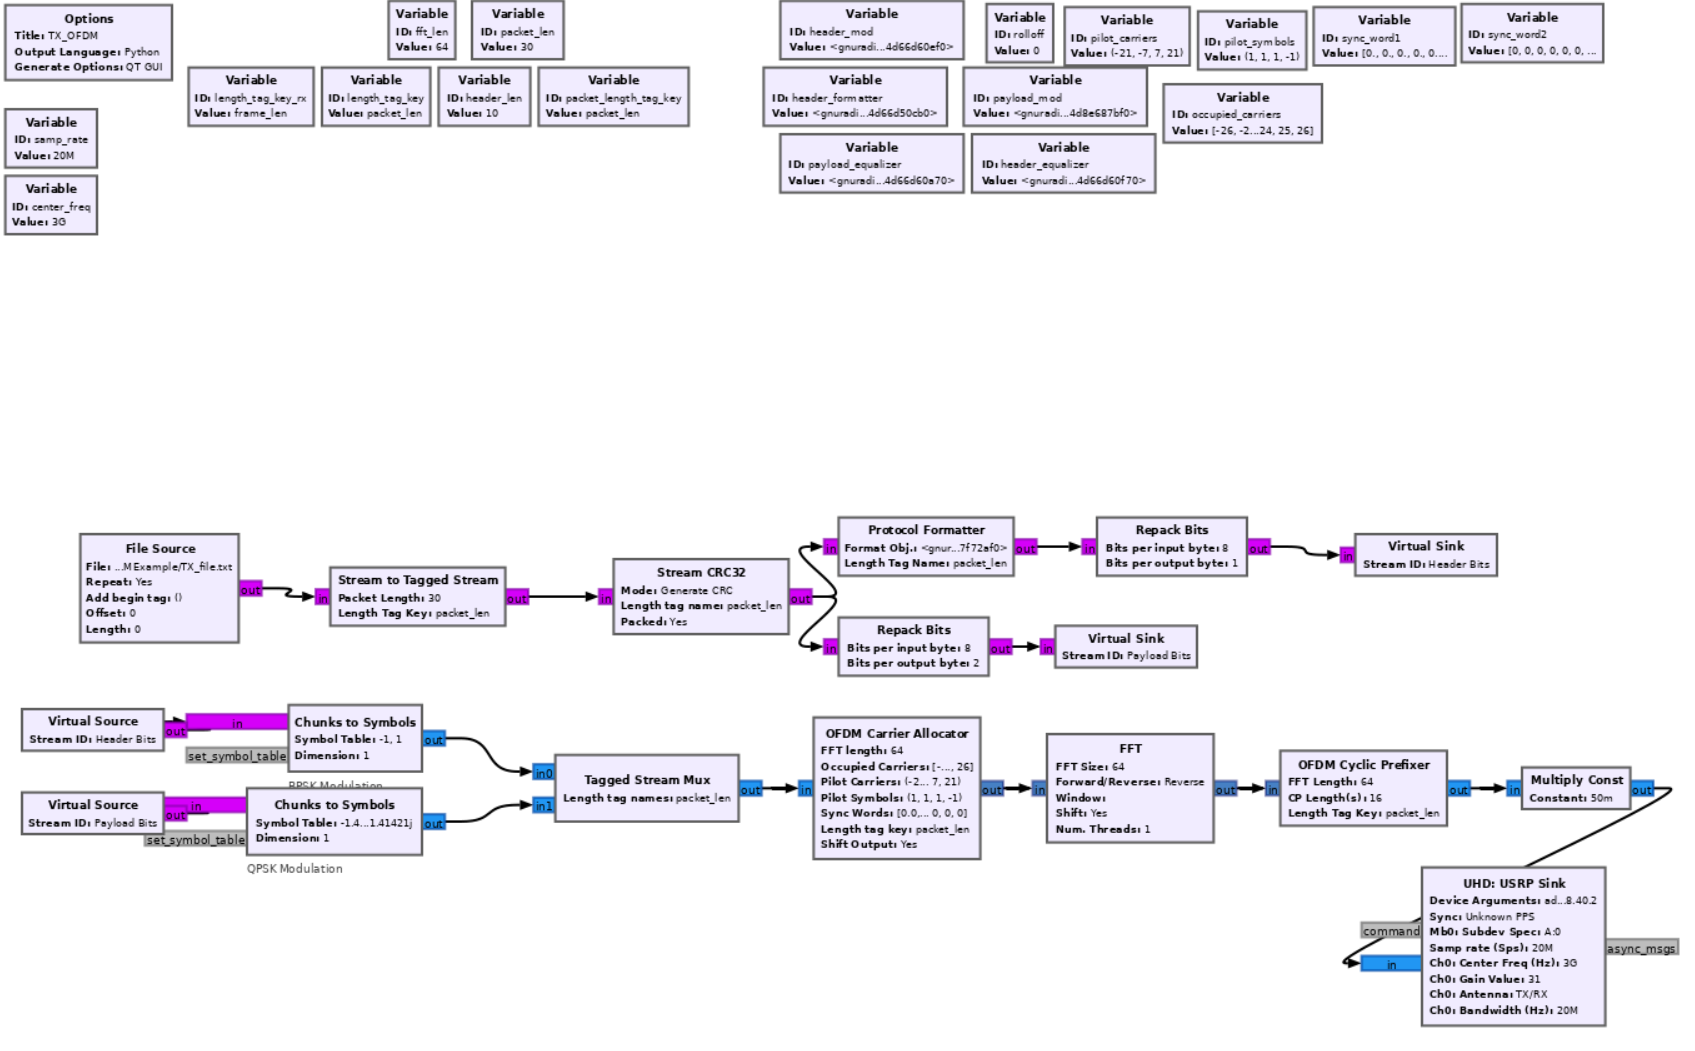
- Open OFDM transmitter on node1-1
root@node1-1:~# cd GNURadioOFDMExample/ root@node1-1:~/GNURadioOFDMExample# gnuradio-companion TX_OFDM.grc <<< Welcome to GNU Radio Companion 3.9.8.0 >>> Block paths: /usr/local/share/gnuradio/grc/blocks Loading: "/root/GNURadioOFDMExample/TX_OFDM.grc" >>> Done |
|

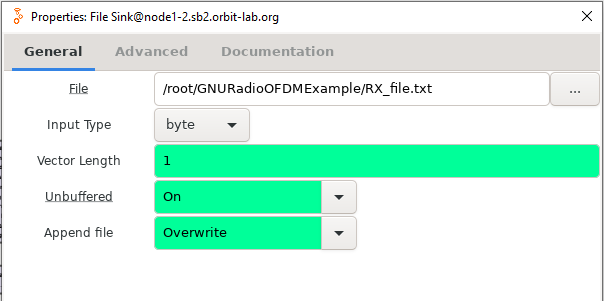
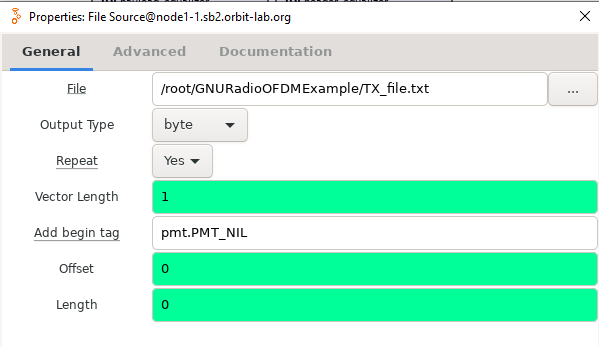
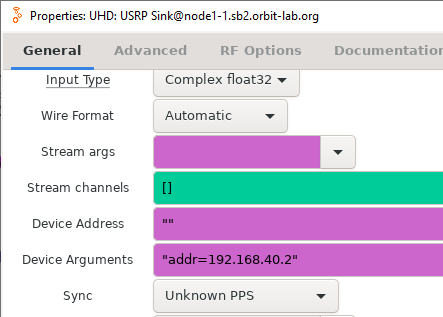
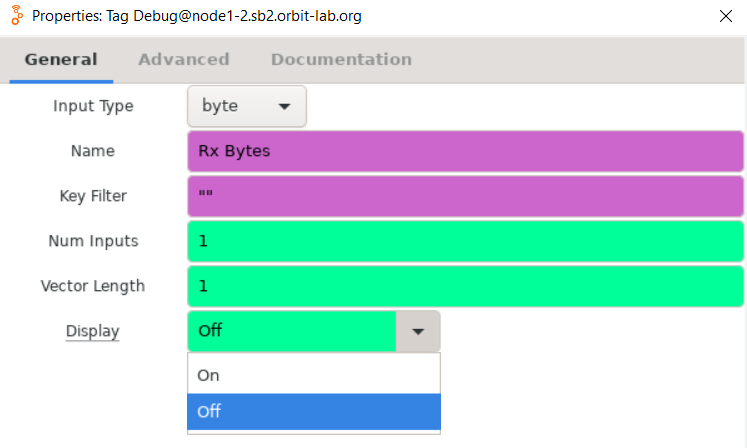
- Make sure the device arguments on both nodes are correctly set as shown below. Check the center frequencies and sample rates, and make sure they match. TX_OFDM.grc has a "File Source" block which reads the text file to be transmitted. RX_OFDM.grc stores the received data in a local file that is specified in the "File Sink" block. Tag Debug block in RX_OFDM_GUI.grc has a Display option, which can be set to 'on', to log various tags used in the flowgraph (Please note that displaying the tags may generate a huge amount of output causing the system to hang. It is advised to turn the display on and collect the output into a file while running in non-GUI mode as shown in the next step)


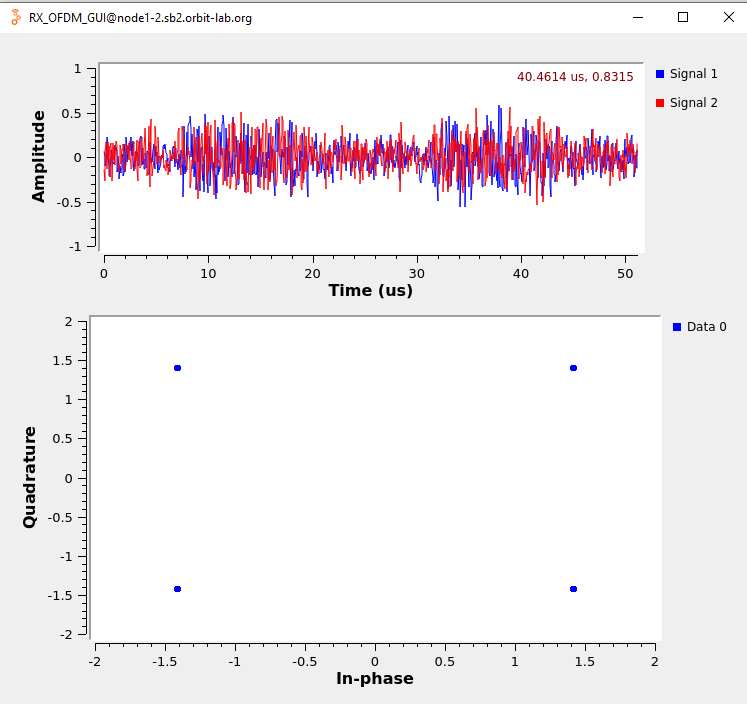
- Run the receive flowgraph followed by the transmit flowgraph. The following display window with received IQ samples and constellation can be seen. Stop the flowgraph and check the received text file. Always shut off the RX side first.

- The above applications can also be run without GUI, by generating Python scripts. Press F5 key to generate the Python scripts.
root@node1-1:~/GNURadioOFDMExample# python3 TX_OFDM.py
root@node1-2:~/GNURadioOFDMExample# python3 RX_OFDM_GUI.py >> TagDebug.txt
Attachments (7)
- FileSink.PNG (17.4 KB ) - added by 3 years ago.
- FileSource.PNG (19.3 KB ) - added by 3 years ago.
- OFDM_SB2_args.PNG (21.2 KB ) - added by 3 years ago.
- RX_OFDM_samples.PNG (80.4 KB ) - added by 3 years ago.
- TX_OFDM_grc.PNG (279.8 KB ) - added by 3 years ago.
- TagDebug.PNG (33.6 KB ) - added by 3 years ago.
- RX_OFDM_grc.PNG (350.8 KB ) - added by 3 years ago.
Download all attachments as: .zip