| Version 48 (modified by , 4 years ago) ( diff ) |
|---|
Site Navigation
- COSMOS Testbed Overview
- Getting Started
- COSMOS/ORBIT User Guide
- COSMOS Portal
- Account Management
- Portal Dashboard
- Directory
- Disk Images
- Community Forum
- Getting Started with the COSMOS Portal
- SSH Access to Testbed Nodes
- Scheduler
- Testbed Status
- Installing Chrome Remote Desktop (CRD) on a Custom Image
- Tutorials
- Architecture
- Resources, Services and APIs
- Datasets
- Hardware Info
- RF Policies & Compliance
IBM 28GHz PAAM Basics
Description
In this tutorial, we demonstrate the basic use of the IBM 28 GHz phased array antenna modules (PAAMs) with USRP N310 software-defined radios (SDRs) in the COSMOS Sandboxes (sb1, sb2).
The following paper describes the integration of the IBM 28 GHz PAAMs (beta-version) with USRP SDRs in the COSMOS testbed. We would appreciate it if you cite this paper when publishing results obtained using the PAAMs deployed in COSMOS.
- T. Chen, P. Maddala, P. Skrimponis, J. Kolodziejski, X. Gu, A. Paidimarri, S. Rangan, G. Zussman, and I. Seskar, “Programmable and open-access millimeter-wave radios in the PAWR COSMOS testbed,” in Proc. ACM Mobi Com’21 Workshop on Wireless Network Testbeds, Experimental evaluation & CHaracterization (WiNTECH’21), 2021.
- X. Gu, A. Paidimarri, B. Sadhu, C. Baks, S. Lukashov, M. Yeck, Y. Kwark, T. Chen, G. Zussman, I. Seskar, and A. Valdes-Garcia, "Development of a compact 28-GHz software-defined phased array for a city-scale wireless research testbed," in Proc. IEEE International Microwave Symposium (IMS’21), 2021.
Author: Tingjun Chen, Duke University (tingjun.chen [at] duke [dot] edu)
Last updated: Apr. 10, 2022
Acknowledgements
This work is collaboration with IBM. We thank Xiaoxiong Gu, Arun Paidimarri, Bodhisatwa Sadhu, and Alberto Valdes-Garcia for their contributions and support. More detailed information about the IBM 28 GHz PAAM can be found in the following references:
- B. Sadhu, Y. Tousi, J. Hallin, S. Sahl, S. K. Reynolds, O. Renstrom, K. Sjogren, O. Haapalahti, N. Mazor, B. Bokinge, G. Weibull, H. Bengtsson, A. Carlinger, E. Westesson, J. Thillberg, L. Rexberg, M. Yeck, X. Gu, M. Ferriss, D. Liu, D. Friedman, A. Valdes-Garcia, "A 28-GHz 32-element TRX phased-array IC with concurrent dual-polarized operation and orthogonal phase and gain control for 5G communications," IEEE Journal of Solid-State Circuits, vol. 52, no. 12, pp. 3373-3391, 2017.
Prerequisites
In order to access a COSMOS sandbox, create a reservation and have it approved by the reservation service. Access to the resources is granted after the reservation is confirmed. Please follow the process shown on the COSMOS getting started page to get started.
Resources Required
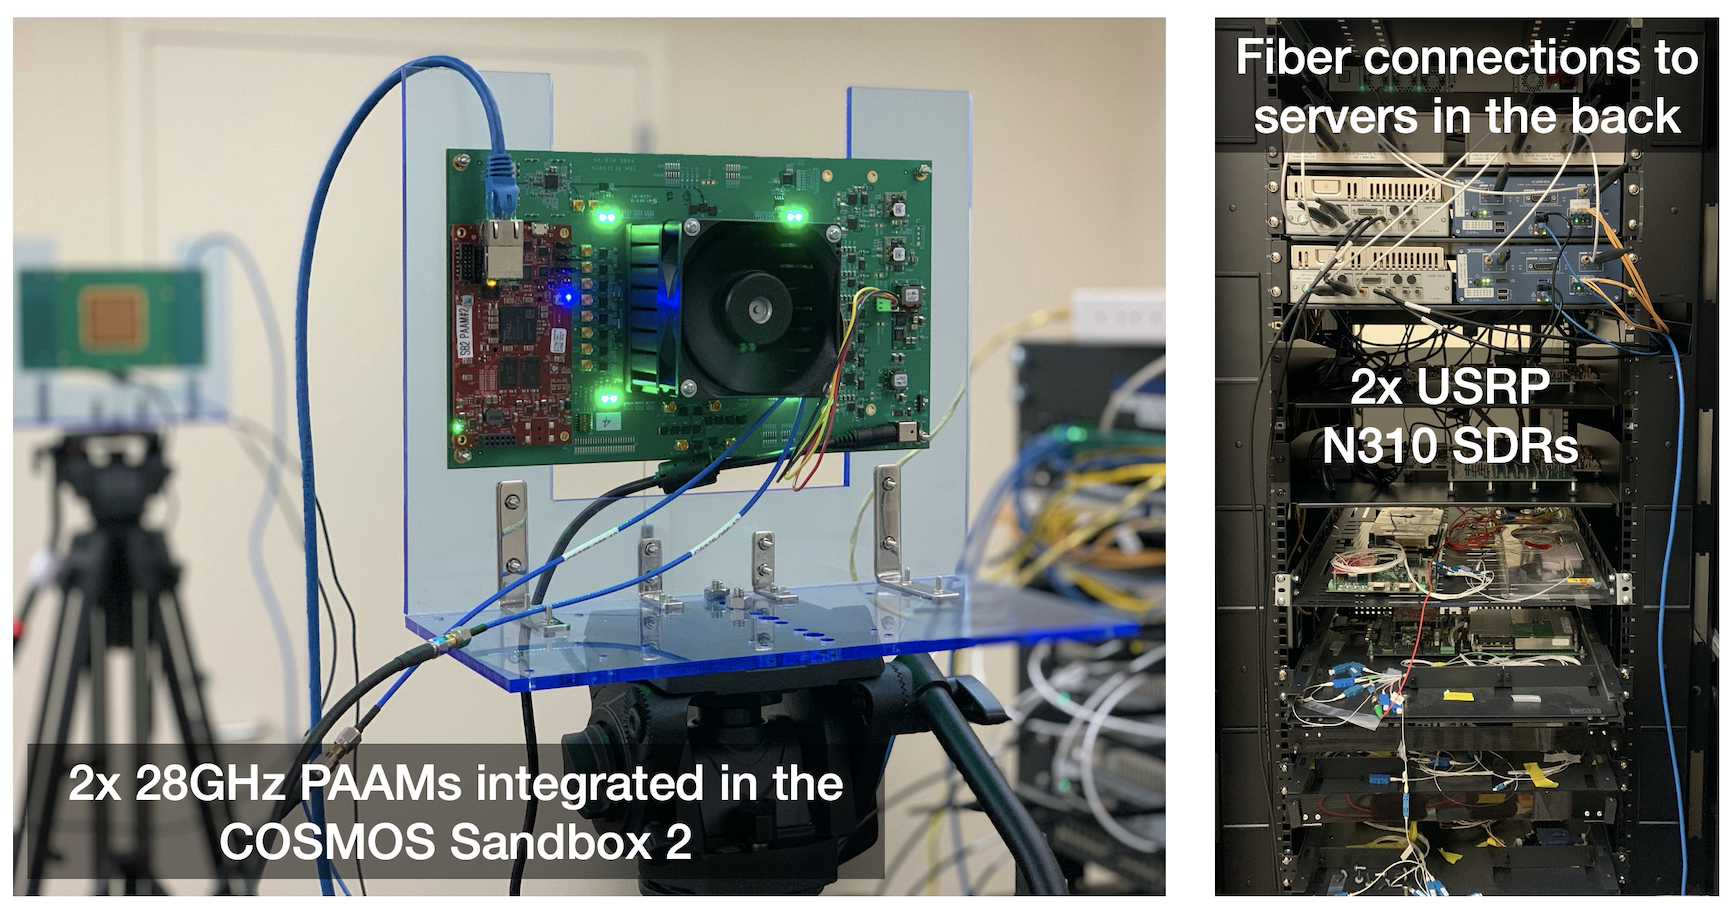
In this tutorial we will use the following hardware resources, which are also shown in the figure below.
- 2 USRP N310 SDRs (
sdr1-in1andsdr1-in2in SB1,sdr1-s1-lg1andsdr1-md1in SB2) - 2 IBM 28GHz PAAMs (
rfdev4-in1andrfdev4-in2in SB1,rfdev2-1andrfdev2-2in SB2 ) - 1 Server (
srv1-lg1)
The current hardware connection in SB1 as shown in this diagram
sdr1-in1RF2 TX/RX —rfdev4-in1IC0/TX/H,sdr1-in1RF2 RX2 —rfdev4-in1IC0/RX/Hsdr1-in1RF3 TX/RX —rfdev4-in1IC0/TX/V,sdr1-in1RF3 RX2 —rfdev4-in1IC0/RX/Vsdr1-in2RF2 TX/RX —rfdev4-in2all ICs/TX/H,sdr1-in2RF2 RX2 —rfdev4-in2all ICs/RX/Hsdr1-in2RF3 TX/RX —rfdev4-in2all ICs/TX/V,sdr1-in2RF2 RX2 —rfdev4-in2all ICs/RX/V
The current hardware connection in SB2:
sdr1-s1-lg1RF2 TX/RX —rfdev2-1IC1/TX/H,sdr1-s1-lg1RF2 RX2 —rfdev2-1IC2/RX/Hsdr1-md1RF2 TX/RX —rfdev2-2IC1/TX/H,sdr1-md1RF2 RX2 —rfdev2-2IC2/RX/H

|
Tutorial Setup
Follow the steps below to gain access to the sandbox console and set up nodes with appropriate images.
- If you don't have one already, sign up for a COSMOS account
- Create a resource reservation on COSMOS SB1 or SB2
- Login into sandbox console (
console.sb1.cosmos-lab.orgorconsole.sb2.cosmos-lab.org) with two SSH sessions. - Make sure all the nodes and devices used in the experiment are turned off. Use the first command for SB1 and the second command for SB2 (note the difference in the device names)
omf tell -a offh -t sdr1-in1,sdr1-in2,rfdev4-in1,rfdev4-in2,srv1-lg1
omf tell -a offh -t sdr1-s1-lg1,sdr1-md1,rfdev2-1,rfdev2-2,srv1-lg1
- Use the
paam28GHz-tutorial-cosmos.ndznode image with Ubuntu 18.04, UHD 3.15, gnuradio 3.8, and a grc example used in this tutorial. Loadpaam28GHz-tutorial-cosmos.ndzon the server.omf load -i paam28GHz-tutorial-cosmos.ndz -t srv1-lg1
- Turn all the required resources on and check the status of all resources
For SB1
omf tell -a on -t sdr1-in1,sdr1-in2,rfdev4-in1,rfdev4-in2,srv1-lg1
For SB2
omf tell -a on -t sdr1-s1-lg1,sdr1-md1,rfdev2-1,rfdev2-2,srv1-lg1
omf stat -t all
sshto the server with option -Y for using GUI with gnuradio.ssh -Y root@srv1-lg1
Experiment Execution
Find and prepare USRPs
- Upon logging into the server, run eth_config.sh script. This sets up the 10G data interfaces eno1, eno2. After running the script, you should see that the data interfaces have the appropriate IP addresses assigned, as per the tables for SB1 and SB2.
|
|
|
- Run
und_find_devicesto make sure that both USRP N310s can be reached:
|
Configure IBM 28GHz PAAM
COSMOS uses a RESTful service for IBM PAAM management The service can be used for
- Dynamic array management - where the user connects to the antenna using
connectcommand, dynamically steers the antenna during the experiment usingsteercommand, and disconnects once the experiment is done. - Static array management - where the user can connect, steer and disconnect using a single command,
configure
Details and examples for the above are provided at the array management page. For this experiment, we use static array management commands as shown below. First, start PAAM #1 (rfdev4-in1) in RX mode with V-polarization using 4 antenna elements on IC 0, and configure the RX beamforming direction to be in the broadside (0,0). Check the current consumption on 2v7_0 and make sure IC0 has been successfully initialized (e.g., 2v7_0 has a current consumption much higher than the other ICs).
root@console:~# curl "http://am1.orbit-lab.org:5054/array_mgmt/configure?dev_name=rfdev4-in1.sb1.cosmos-lab.org&ics=0&num_elements=4&txrx=rx&pol=v&theta=0&phi=0"
<?xml version="1.0" encoding="UTF-8"?>
<response status="OK">
  <action service="array_mgmt" name="configure" ipaddr="10.37.7.1">
    <step name="open" duration="3.552750"/>
    <step name="initializaition" duration="0.070964"/>
    <step name="enabling" duration="0.008952"/>
    <step name="steering" duration="0.002530"/>
    <state PAAM_ID="0x36" LO_switch="PLL" if_sw1="0x0" if_sw2="0x0" if_sw3="0x0" if_sw4="0x0"/>
    <adc>
      <conv index="0" name="1v2" tADC="114" tVolt="0.279" tCurr="0.139"/>
      <conv index="1" name="1v5" tADC="176" tVolt="0.430" tCurr="0.860"/>
      <conv index="2" name="1v8" tADC="12" tVolt="0.029" tCurr="0.015"/>
      <conv index="3" name="2v7_0" tADC="138" tVolt="0.337" tCurr="0.674"/>
      <conv index="4" name="2v7_1" tADC="27" tVolt="0.066" tCurr="0.132"/>
      <conv index="5" name="2v7_2" tADC="51" tVolt="0.125" tCurr="0.249"/>
      <conv index="6" name="2v7_3" tADC="19" tVolt="0.046" tCurr="0.093"/>
      <conv index="7" name="3v3_pll" tADC="114" tVolt="0.279" tCurr="0.139"/>
      <conv index="8" name="5v_uzed" tADC="310" tVolt="0.758" tCurr="0.758"/>
      <conv index="9" name="12v" tADC="132" tVolt="0.323" tCurr="1.075"/>
      <conv index="10" name="0V" tADC="0" tVolt="0.000"/>
      <conv index="11" name="1V8" tADC="737" tVolt="1.801"/>
    </adc>
    <step name="status" duration="0.020860"/>
    <step name="close" duration="0.101753"/>
  </action>
</response>
Similarly, start PAAM #2 (rfdev4-in2) in TX mode with V-polarization using 16 antenna elements on all the ICs, and configure the TX beamforming direction to be in the broadside (0,0). Check the current consumption to make sure the ICs have been successfully initialized.
root@console:~# curl "http://am1.orbit-lab.org:5054/array_mgmt/configure?dev_name=rfdev4-in2.sb1.cosmos-lab.org&ics=all&num_elements=16&txrx=tx&pol=v&theta=0&phi=0"
<?xml version="1.0" encoding="UTF-8"?>
<response status="OK">
  <action service="array_mgmt" name="configure" ipaddr="10.37.7.2">
    <step name="open" duration="3.608602"/>
    <step name="initializaition" duration="0.071819"/>
    <step name="enabling" duration="0.016513"/>
    <step name="steering" duration="0.007925"/>
    <state PAAM_ID="0x30" LO_switch="PLL" if_sw1="0x0" if_sw2="0x0" if_sw3="0x0" if_sw4="0x0"/>
    <adc>
      <conv index="0" name="1v2" tADC="114" tVolt="0.279" tCurr="0.139"/>
      <conv index="1" name="1v5" tADC="366" tVolt="0.894" tCurr="1.789"/>
      <conv index="2" name="1v8" tADC="3" tVolt="0.007" tCurr="0.004"/>
      <conv index="3" name="2v7_0" tADC="179" tVolt="0.437" tCurr="0.875"/>
      <conv index="4" name="2v7_1" tADC="212" tVolt="0.518" tCurr="1.036"/>
      <conv index="5" name="2v7_2" tADC="208" tVolt="0.508" tCurr="1.017"/>
      <conv index="6" name="2v7_3" tADC="187" tVolt="0.457" tCurr="0.914"/>
      <conv index="7" name="3v3_pll" tADC="128" tVolt="0.313" tCurr="0.156"/>
      <conv index="8" name="5v_uzed" tADC="262" tVolt="0.640" tCurr="0.640"/>
      <conv index="9" name="12v" tADC="243" tVolt="0.594" tCurr="1.979"/>
      <conv index="10" name="0V" tADC="0" tVolt="0.000"/>
      <conv index="11" name="1V8" tADC="733" tVolt="1.791"/>
    </adc>
    <step name="status" duration="0.020535"/>
    <step name="close" duration="0.101897"/>
  </action>
</response>
If you are on SB2, the commands are:
PAAM #1 (rfdev2-1.sb2.cosmos-lab.org)
root@console:~# curl "http://am1.orbit-lab.org:5054/array_mgmt/configure?dev_name=rfdev2-1.sb2.cosmos-lab.org&ics=1&num_elements=4&txrx=tx&pol=h&theta=0&phi=0"
PAAM #2 (rfdev2-2.sb2.cosmos-lab.org)
root@console:~# curl "http://am1.orbit-lab.org:5054/array_mgmt/configure?dev_name=rfdev2-2.sb2.cosmos-lab.org&ics=2&num_elements=4&txrx=rx&pol=h&theta=0&phi=0"
Run the experiment
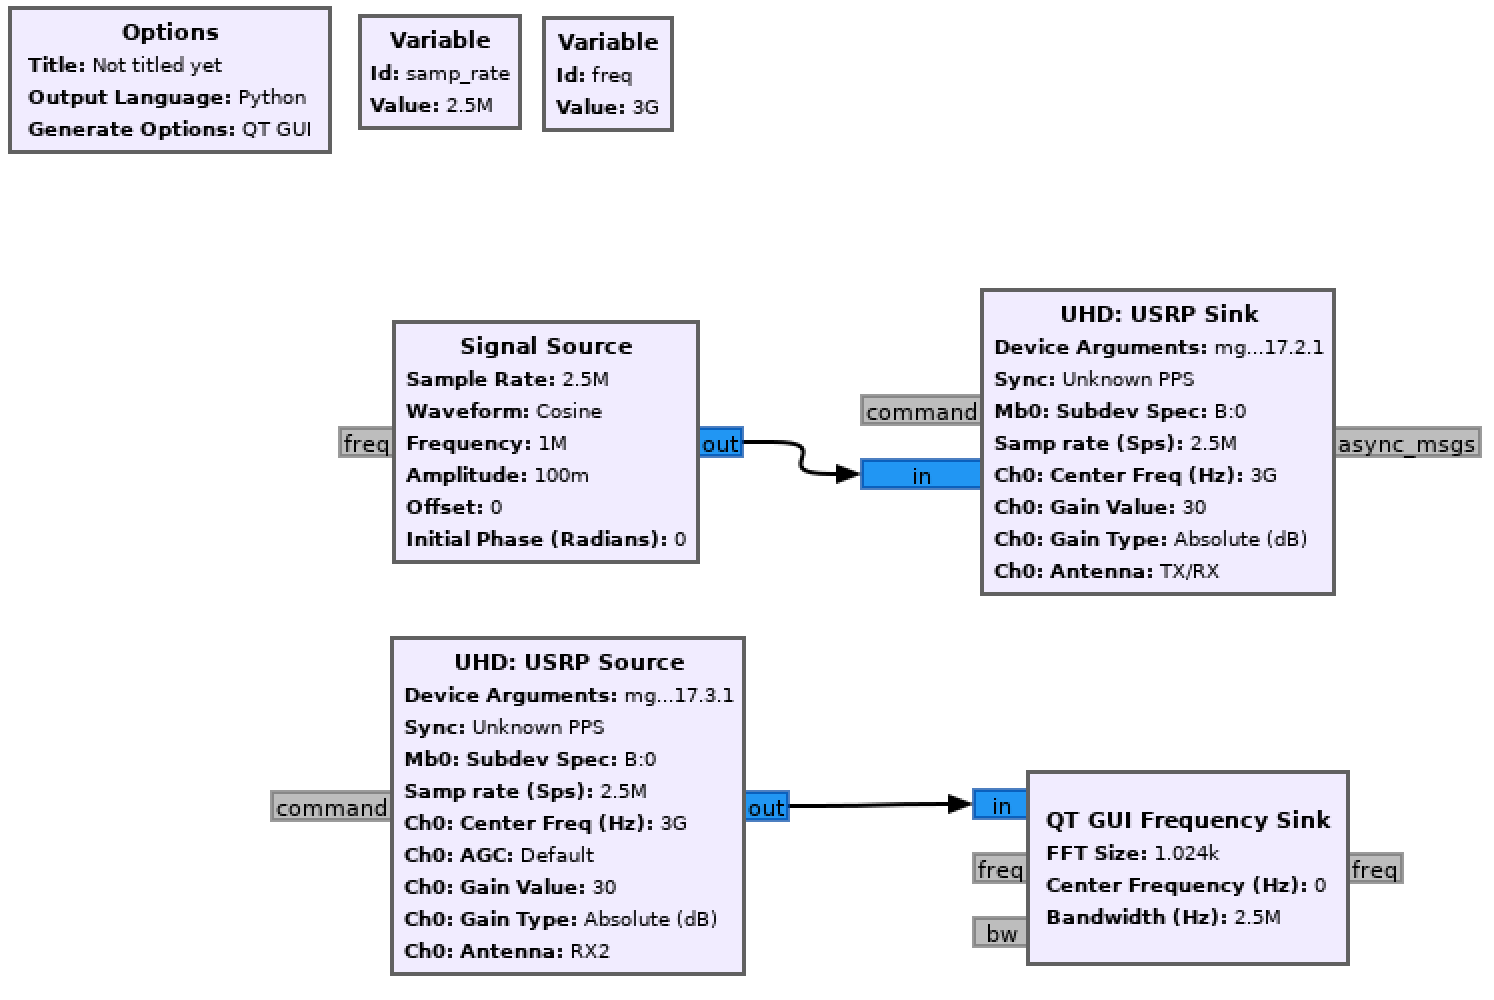
- On srv1-lg1, start gnuradio companion and open the example experiment that establishes a single tone transmission:
root@srv1-lg1:~# gnuradio-companion example_paam_tone.grc
- For running the experiment on SB1, configure the USRP sink (TX) with sdr1-in2 ("mgmt_addr=10.37.6.2,addr=10.38.6.2") and the USRP source (RX) with sdr1-in1("mgmt_addr=10.37.6.1,addr=10.37.6.2"). For SB2, configure the USRP sink (TX) with sdr1-s1-lg1 ("mgmt_addr=10.116.2.1,addr=10.117.2.1") and the USRP source (RX) with sdr1-md1 ("mgmt_addr=10.116.3.1,addr=10.117.3.1"). Set the carrier frequency to 3GHz (3e9) and the subdev to be "B:1" (RF3) (For SB2, use "B:0", RF2) on both TX and RX. In this example flowgraph, the sampling rate and the tone frequency are set to be 2.5MHz (2.5e6) and 1MHz (1e6), respectively.

|
Observe the results
Figure below shows the frequency response of the received tone at 1MHz offset.

|
Finish the experiments
When the experiments are completed, make sure to clean up and turn off the PAAMs.
For SB1:
root@console:~# curl "http://am1.orbit-lab.org:5054/array_mgmt/cleanup?dev_name=rfdev4-in1.sb1.cosmos-lab.org"
root@console:~# omf tell -a offh -t rfdev4-in1.sb1.cosmos-lab.org
root@console:~# curl "http://am1.orbit-lab.org:5054/array_mgmt/cleanup?dev_name=rfdev4-in2.sb1.cosmos-lab.org"
root@console:~# omf tell -a offh -t rfdev4-in2.sb1.cosmos-lab.org
For SB2:
root@console:~# curl "http://am1.orbit-lab.org:5054/array_mgmt/cleanup?dev_name=rfdev2-1.sb2.cosmos-lab.org"
root@console:~# omf tell -a offh -t rfdev2-1.sb2.cosmos-lab.org
root@console:~# curl "http://am1.orbit-lab.org:5054/array_mgmt/cleanup?dev_name=rfdev2-2.sb2.cosmos-lab.org"
root@console:~# omf tell -a offh -t rfdev2-2.sb2.cosmos-lab.org
Attachments (4)
-
mmwavePaamBasicsFlowgraph.png
(105.3 KB
) - added by 5 years ago.
mmWave PAAM basics grc flowgraph
- mmwavePaamBasicsFreq_n_4.png (136.6 KB ) - added by 5 years ago.
- mmwavePaamBasicsFreq_n_8.png (138.8 KB ) - added by 5 years ago.
- mmwavePaamBasicsSetup.png (2.8 MB ) - added by 5 years ago.