Site Navigation
- COSMOS Testbed Overview
- Getting Started
- COSMOS/ORBIT User Guide
- COSMOS Portal
- Account Management
- Portal Dashboard
- Directory
- Disk Images
- Community Forum
- Getting Started with the COSMOS Portal
- SSH Access to Testbed Nodes
- Scheduler
- Testbed Status
- Installing Chrome Remote Desktop (CRD) on a Custom Image
- Tutorials
- Architecture
- Resources, Services and APIs
- Datasets
- Hardware Info
- RF Policies & Compliance
Configuring SSH Tunnels
A common need is to connect to some resource on the testbed as if it were local. SSH provides this functionality.
Select the OS of your computer
Linux & MacOS
Here, we define the following arguments:
- localuser: your username on your local machine
- localmachine: the computer that you're sitting at
- localport: a port on your local machine, accessed via localhost:localport
- testbeduser: your COSMOS username
- remotename: the resource you wish to connect to, for example, srv1-lg1.sb1.cosmos-lab.org
- consolename: the dns name of the COSMOS console you're using
The following command will allow you to access remotename:remoteport by instead accessing localmachine:localport.
This access is tunneled through the console, consolename.cosmos-lab.org, via a ssh session running under your user account, testbeduser.
localuser@localmachine:~$ ssh testbeduser@consolename.cosmos-lab.org \
-L localport:remotename:remoteport
Here's an example, tunneling two ports to two different machines. The "-N" flag only forwards the ports, without opening a remote shell.
localuser@localmachine:~$ ssh testbeduser@sb1.cosmos-lab.org -N \
-L 9980:srv1-lg1:80 \
-L 9981:srv2-lg1:80
To make permanent:
On Linux or Mac, via the terminal, make or edit a file at
~/.ssh/config by default.
Make an entry like the following, replacing the specifics as needed
Host console.sb1.cosmos-lab.org
  LocalForward 9001 srv1-lg1.sb1.cosmos-lab.org:80
Now, when you ssh to console.sb1.cosmos-lab.org, traffic that you send to localhost port 9001, will be proxied and sent to srv1-lg1.sb1.cosmos-lab.org port 80. We commonly use this to access webUIs and similar things running on a node.
Most SSH clients for other platforms have similar functionality. The important thing is to remember that the left side is your local port, and the right side is something that $HOST can talk to.
To forward an additional port, or the same port on another device, add more lines.
LocalForward 9002 srv1-lg1.sb1.cosmos-lab.org:443
LocalForward 9003 srv1-lg1.sb1.cosmos-lab.org:80
LocalForward 9004 srv3-lg1.sb1.cosmos-lab.org:9090
Just ensure that the ports on the left don't conflict.
Windows
These instructions assume that you are using PuTTY as your SSH client and have configured your SSH session according to the SSH Tutorial instructions.
Configuring PuTTY SSH Tunneling
- Configure your session login information (or load it from a saved config) first.
- Navigate through the left side menu tree to "Connection" → "SSH" → "Auth".

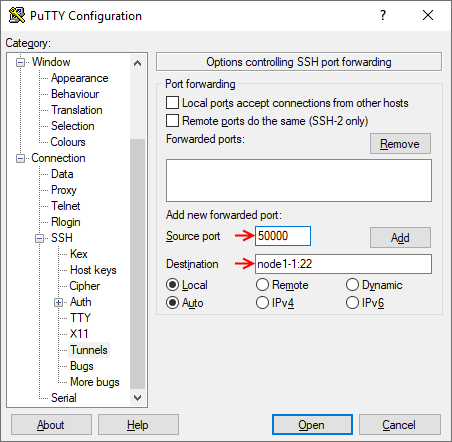
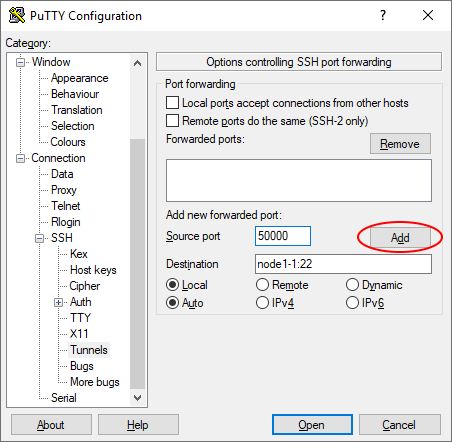
- Enter the local port you want to forward in the "Source port" field and the remote resource name (or IP address) along with the remote port in the "Destination" field (Note the colon ':' between the two). Avoid using a local port that may conflict with locally running services. In this example, the local port 50000 is forwarded to port 22 on node1-1.

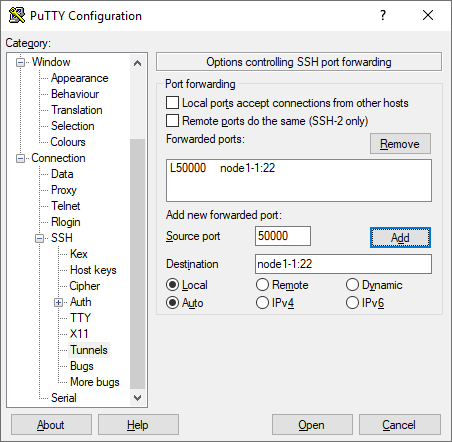
- Click "Add" to add the tunnel to the session.


- Repeat steps 2-3 for as many ports as you need to forward. Remember that each local port you use can only map to a single remote resource/port destination.
- If you click "Open", your session will start with the configured ports tunneled, but when you close the session you will have to configure the ports again. If you go back to the "Session" screen and save the settings, the port tunneling configuration will be saved for future use.
Attachments (4)
- putty_tunnel_01.png (17.0 KB ) - added by 7 years ago.
- putty_tunnel_02.png (17.7 KB ) - added by 7 years ago.
- putty_tunnel_03.png (18.6 KB ) - added by 7 years ago.
- putty_tunnel_04.png (17.8 KB ) - added by 7 years ago.
Download all attachments as: .zip