Site Navigation
- COSMOS Testbed Overview
- Getting Started
- COSMOS/ORBIT User Guide
- COSMOS Portal
- Account Management
- Portal Dashboard
- Directory
- Disk Images
- Community Forum
- Getting Started with the COSMOS Portal
- SSH Access to Testbed Nodes
- Scheduler
- Testbed Status
- Installing Chrome Remote Desktop (CRD) on a Custom Image
- Tutorials
- Architecture
- Resources, Services and APIs
- Datasets
- Hardware Info
- RF Policies & Compliance
GNURadio CFO Estimation tutorial
Description
This tutorial illustrates the use of GNURadio flowgraphs to estimate the Carrier Frequency offset between a pair of USRPs in COSMOS, ORBIT testbeds. Schmidt Cox algorithm for coarse frequency offset estimation for OFDM is used in this tutorial.
Prerequisites
In order to access the test bed, create a reservation and have it approved by the reservation service. Access to the resources is granted after the reservation is confirmed. Please follow the process shown on the COSMOS getting started page to get started.
Resources required
2 USRPs in COSMOS or ORBIT testbed, 2 host nodes, and 2 mmWave devices(if using mmWave) are required. This page uses the 28GHz IBM mmWave devices in sb1.cosmos-lab.org. As shown in the basic tutorial for IBM 28GHz devices, the current connections in SB1 are as shown in this diagram
sdr1-in1RF2 TX/RX —rfdev4-in1all ICs/TX/H,sdr1-in1RF2 RX2 —rfdev4-in1all ICs/RX/Hsdr1-in1RF3 TX/RX —rfdev4-in1all ICs/TX/V,sdr1-in1RF3 RX2 —rfdev4-in1all ICs/RX/Vsdr1-in2RF2 TX/RX —rfdev4-in2all ICs/TX/H,sdr1-in2RF2 RX2 —rfdev4-in2all ICs/RX/Hsdr1-in2RF3 TX/RX —rfdev4-in2all ICs/TX/V,sdr1-in2RF2 RX2 —rfdev4-in2all ICs/RX/V
Hence, the resources required to execute this tutorial are rfdev4-in1, rfdev4-in2 (IBM PAAMs), sdr1-in1, sdr1-in2 (USRP N310s), srv1-lg1, srv2-lg1 in sb1.cosmos-lab.org.
Tutorial Setup
Follow the steps below to gain access to the sandbox console and set up nodes with appropriate images.
- If you don't have one already, sign up for a COSMOS account
- Create a resource reservation on COSMOS SB1
- Login into sandbox console (
console.sb1.cosmos-lab.orgwith two SSH sessions. - Make sure all the nodes and devices used in the experiment are turned off.
omf tell -a offh -t sdr1-in1,sdr1-in2,rfdev4-in1,rfdev4-in2,srv1-lg1,srv2-lg1
- Use the
gnuradio_ofdm.ndznode image with Ubuntu 20.04, UHD 4.4, gnuradio 3.9, and a grc example used in this tutorial. Loadgnuradio_ofdm.ndzon the servers.omf load -i gnuradio_ofdm.ndz -t srv1-lg1,srv2-lg1
- Turn all the required resources on and check the status of all the resources. Use the following commands .
omf tell -a on -t sdr1-in1,sdr1-in2,rfdev4-in1,rfdev4-in2,srv1-lg1,srv2-lg1
omf stat -t all
sshto the servers with option -Y for using GUI with gnuradio.ssh -Y root@srv1-lg1
ssh -Y root@srv2-lg1
Experiment Execution
Find and prepare USRPs
- Upon logging into the servers, run eth_config_sb1.sh script on each of the servers. This sets up the 10G data interfaces DATA1, DATA2. After running the script, you should see that the data interfaces have the appropriate IP addresses assigned, as per the table for SB1.
root@srv1-lg1:~# ./eth_config_sb1.sh
root@srv1-lg1:~# ip addr
2: DATA1: <BROADCAST,MULTICAST,UP,LOWER_UP> mtu 9000 qdisc mq state UP group default qlen 1000
    link/ether 1c:34:da:42:0c:3c brd ff:ff:ff:ff:ff:ff
    inet 10.38.1.1/16 scope global DATA1
       valid_lft forever preferred_lft forever
    inet6 fe80::1e34:daff:fe42:c3c/64 scope link
       valid_lft forever preferred_lft forever
3: DATA2: <BROADCAST,MULTICAST,UP,LOWER_UP> mtu 9000 qdisc mq state UP group default qlen 1000
    link/ether 1c:34:da:42:0c:3d brd ff:ff:ff:ff:ff:ff
    inet 10.39.1.1/16 scope global DATA2
       valid_lft forever preferred_lft forever
    inet6 fe80::1e34:daff:fe42:c3d/64 scope link
       valid_lft forever preferred_lft forever
- Run
und_find_devicesto make sure that both USRP N310s can be reached from both the servers:root@srv1-lg1:~# uhd_find_devices [INFO] [UHD] linux; GNU C++ version 9.4.0; Boost_107100; UHD_4.4.0.0-0ubuntu1~focal1 -------------------------------------------------- -- UHD Device 0 -------------------------------------------------- Device Address: serial: 3176DEB addr: 10.39.6.1 claimed: False fpga: XG mgmt_addr: 10.37.6.1 mgmt_addr: 10.38.6.1 mgmt_addr: 10.39.6.1 name: ni-n3xx-3176DEB product: n310 type: n3xx -------------------------------------------------- -- UHD Device 2 -------------------------------------------------- Device Address: serial: 3176DFA addr: 10.39.6.2 claimed: False fpga: HG mgmt_addr: 10.37.6.2 mgmt_addr: 10.39.6.2 name: ni-n3xx-3176DFA product: n310 type: n3xx
Configure IBM 28GHz PAAM
COSMOS uses a RESTful service for IBM PAAM management The service can be used for
- Dynamic array management - where the user connects to the antenna using
connectcommand, dynamically steers the antenna during the experiment usingsteercommand, and disconnects once the experiment is done. - Static array management - where the user can connect, steer and disconnect using a single command,
configure
Details and examples for the above are provided at the array management page. For this experiment, we use static array management commands as shown below. First, start PAAM #1 (rfdev4-in1) in TX mode with H-polarization using 16 antenna elements on all the ICs, and configure the TX beamforming direction to be in the broadside (0,0). Check the current consumption on 2v7_0,1,2,3 to make sure all the ICs have been successfully initialized.
root@console:~# curl "http://am1.orbit-lab.org:5054/array_mgmt/configure?dev_name=rfdev4-in1.sb1.cosmos-lab.org&ics=all&num_elements=16&txrx=tx&pol=h&theta=0&phi=0"
<?xml version="1.0" encoding="UTF-8"?>
<response status="OK">
  <action service="array_mgmt" name="configure" ipaddr="10.37.7.1">
    <step name="open" duration="3.254270"/>
    <step name="initializaition" duration="0.072135"/>
    <step name="enabling" duration="0.020807"/>
    <step name="steering" duration="0.010150"/>
    <state PAAM_ID="0x24" LO_switch="PLL" if_sw1="0x0" if_sw2="0x0" if_sw3="0x0" if_sw4="0x0" txrx="tx" polarization="h" />
    <adc>
      <conv index="0" name="1v2" tADC="107" tVolt="0.261" tCurr="0.131"/>
      <conv index="1" name="1v5" tADC="345" tVolt="0.843" tCurr="1.686"/>
      <conv index="2" name="1v8" tADC="0" tVolt="0.000" tCurr="0.000"/>
      <conv index="3" name="2v7_0" tADC="262" tVolt="0.640" tCurr="1.281"/>
      <conv index="4" name="2v7_1" tADC="270" tVolt="0.660" tCurr="1.320"/>
      <conv index="5" name="2v7_2" tADC="259" tVolt="0.633" tCurr="1.266"/>
      <conv index="6" name="2v7_3" tADC="276" tVolt="0.674" tCurr="1.349"/>
      <conv index="7" name="3v3_pll" tADC="46" tVolt="0.112" tCurr="0.056"/>
      <conv index="8" name="5v_uzed" tADC="308" tVolt="0.753" tCurr="0.753"/>
      <conv index="9" name="12v" tADC="328" tVolt="0.802" tCurr="2.672"/>
      <conv index="10" name="0V" tADC="0" tVolt="0.000"/>
      <conv index="11" name="1V8" tADC="736" tVolt="1.799"/>
    </adc>
    <step name="status" duration="0.018327"/>
    <step name="close" duration="0.100188"/>
  </action>
</response>
Similarly, start PAAM #2 (rfdev4-in2) in RX mode with H-polarization using 16 antenna elements on all the ICs, and configure the RX beamforming direction to be in the broadside (0,0). Check the current consumption to make sure the ICs have been successfully initialized.
root@console:~# curl "http://am1.orbit-lab.org:5054/array_mgmt/configure?dev_name=rfdev4-in2.sb1.cosmos-lab.org&ics=all&num_elements=16&txrx=rx&pol=h&theta=0&phi=0"
<?xml version="1.0" encoding="UTF-8"?>
<response status="OK">
  <action service="array_mgmt" name="configure" ipaddr="10.37.7.2">
    <step name="open" duration="3.295830"/>
    <step name="initializaition" duration="0.071303"/>
    <step name="enabling" duration="0.019037"/>
    <step name="steering" duration="0.010038"/>
    <state PAAM_ID="0x33" LO_switch="PLL" if_sw1="0x0" if_sw2="0x0" if_sw3="0x0" if_sw4="0x0" txrx="rx" polarization="h" />
    <adc>
      <conv index="0" name="1v2" tADC="106" tVolt="0.259" tCurr="0.130"/>
      <conv index="1" name="1v5" tADC="345" tVolt="0.843" tCurr="1.686"/>
      <conv index="2" name="1v8" tADC="0" tVolt="0.000" tCurr="0.000"/>
      <conv index="3" name="2v7_0" tADC="209" tVolt="0.511" tCurr="1.022"/>
      <conv index="4" name="2v7_1" tADC="171" tVolt="0.418" tCurr="0.836"/>
      <conv index="5" name="2v7_2" tADC="219" tVolt="0.535" tCurr="1.070"/>
      <conv index="6" name="2v7_3" tADC="217" tVolt="0.530" tCurr="1.061"/>
      <conv index="7" name="3v3_pll" tADC="172" tVolt="0.420" tCurr="0.210"/>
      <conv index="8" name="5v_uzed" tADC="374" tVolt="0.914" tCurr="0.914"/>
      <conv index="9" name="12v" tADC="316" tVolt="0.772" tCurr="2.574"/>
      <conv index="10" name="0V" tADC="0" tVolt="0.000"/>
      <conv index="11" name="1V8" tADC="738" tVolt="1.804"/>
    </adc>
    <step name="status" duration="0.017713"/>
    <step name="close" duration="0.100175"/>
  </action>
</response>
Run the experiment
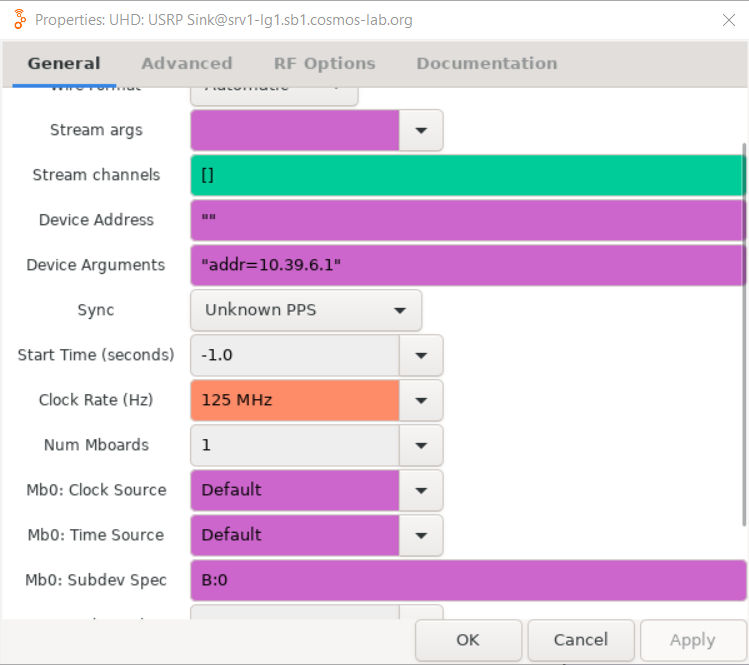
- Transmit an OFDM waveform from sdr1-in1+rfdev4-in1 by running the flowgraph TX_OFDM.grc on srv1-lg1. Launch gnuradio-companion on srv1-lg1
root@srv1-lg1:~# cd GNURadioOFDMExample/
root@srv1-lg1:~/GNURadioOFDMExample# gnuradio-companion TX_OFDM.grc
- Please make sure the USRP sink (TX) in TX_OFDM.grc is configured with sdr1-in1 ("addr=10.39.6.1"). Set the carrier frequency to 3GHz (3e9) and the subdev to be "B:0" (RF3). In this flowgraph, the sampling rate is set to 62.5 MSPS and the number of OFDM subcarriers set to 64. So the maximum CFO that can be detected is 62.5/(2*64) = 0.488 MHz.

|
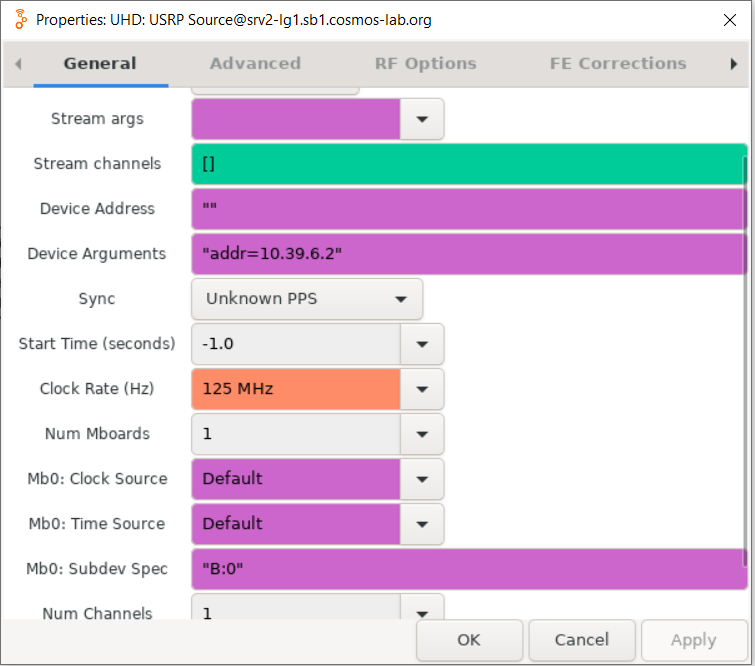
- Receive the OFDM waveform on sdr1-in2+rfdev4-in2 by running the flowgraph RX_OFDM_CFO_estimation.grc on srv2-lg1. Launch gnuradio-companion on srv1-lg1
root@srv2-lg1:~# cd GNURadioOFDMExample/
root@srv2-lg1:~/GNURadioOFDMExample# gnuradio-companion RX_OFDM_CFO_estimation.grc
- Please make sure the USRP source (RX) in RX_OFDM_CFO_estimation.grc is configured with sdr1-in2("addr=10.39.6.2"). Set the carrier frequency to 3GHz (3e9) and the subdev to be "B:0" (RF3).

|
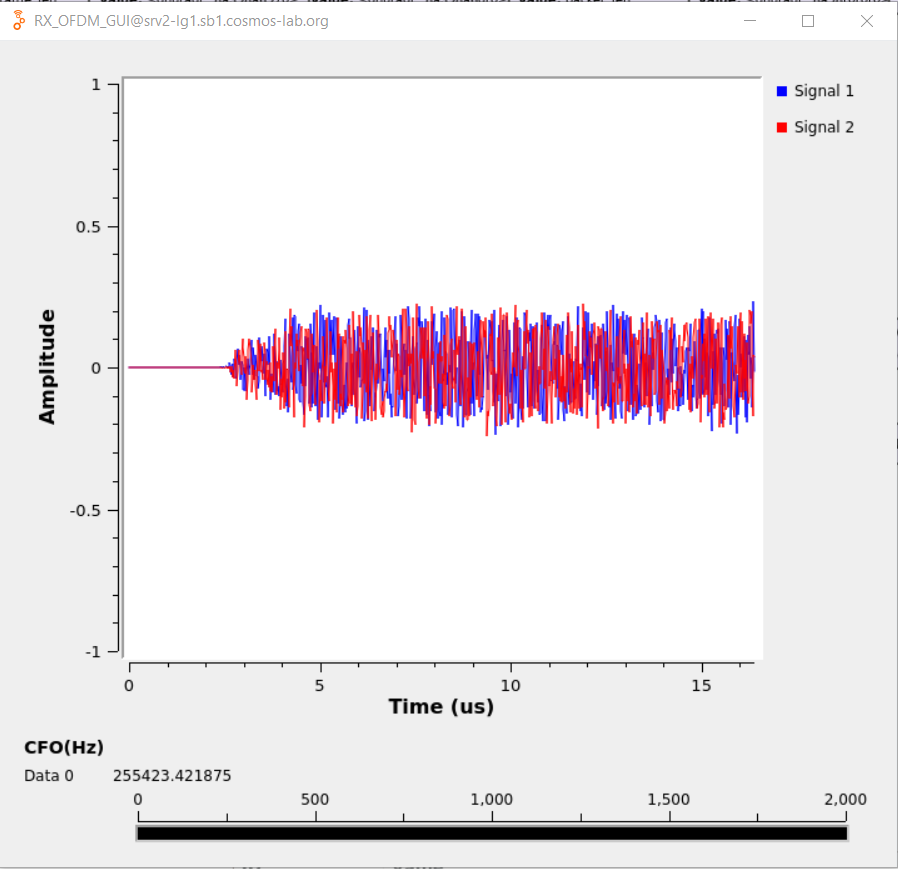
- Start both the flowgraphs to see receive IQ samples and per packet estimated CFO value at the receiver.

|
Attachments (3)
- RX_OFDM_CFO_capture.PNG (178.8 KB ) - added by 2 years ago.
- usrp_source_rx_ofdm.PNG (78.6 KB ) - added by 2 years ago.
- usrp_sink_tx_ofdm.PNG (76.5 KB ) - added by 2 years ago.
Download all attachments as: .zip