| Version 8 (modified by , 5 years ago) ( diff ) |
|---|
Table of Contents
- Description
- Tutorial Setup
- Experiment Execution
- Start the ONOS GUI
- Start the ORCHESTRATOR
- Saving the Node Images
Site Navigation
- COSMOS Testbed Overview
- Getting Started
- COSMOS/ORBIT User Guide
- COSMOS Portal
- Account Management
- Portal Dashboard
- Directory
- Disk Images
- Community Forum
- Getting Started with the COSMOS Portal
- SSH Access to Testbed Nodes
- Scheduler
- Testbed Status
- Installing Chrome Remote Desktop (CRD) on a Custom Image
- Tutorials
- Architecture
- Resources, Services and APIs
- Datasets
- Hardware Info
- RF Policies & Compliance
InterDigital EdgeLink Platform
Description
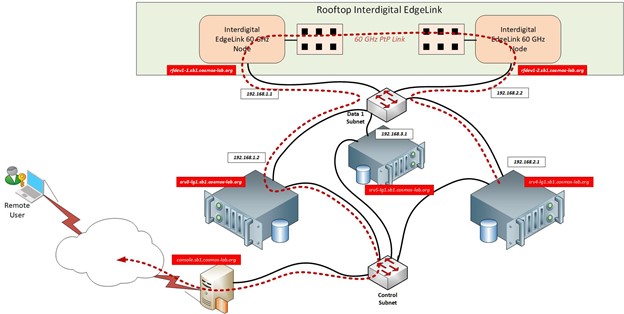
In this tutorial we'll demonstrate how to use InterDigital EdgeLink mmW Mesh Transport System. The setup for the experiment is shown in Figure 1.
")
In order to access the test bed, create a reservation and have it approved by the reservation service. Access to the resources are granted only after the reservation is confirmed. Please follow the process shown on the COSMOS work flow page to get started.
Tutorial Setup
Follow the steps below to gain access to the sandbox 1 console and set up nodes with appropriate images.
- If you don't have one already, sign up for a COSMOS account
- Create a resource reservation on sandbox 1
- Prepare your local computer (i.e. laptop) for Edgelink ONOS and Orchestrator status page access:
- To access the ONOS GUI prepare ssh tunnel to the sandbox 1 console and the Network Controller server, port 8181 (i.e. map localhost:8181 to srv1-in3.sb1.cosmos-lab.org:8181)
- To access the ORCHESTRATOR GUI prepare ssh tunnel to the sandbox 1 console to the Network Controller server, port 8888 (i.e. map localhost:8888 to srv1-in3.sb1.cosmos-lab.org:8888)
- If VPN is preferred over SSH then follow the instructions to establish a VPN tunnel to the COSMOS sandbox 1. This will be used by the browser to connect to a web server running on the server nodes.
- Login into sandbox 1 console (console.sb1.cosmos-lab.org) with multiple SSH sessions as needed.
- For this experimentation, srv1-in3 will be used as a controller node, srv1-in1 and srv1-in2 as traffic machines
- Check the status and make sure the server and all the devices used in the experiment are turned off:
To turn off the resources needed for the experiment:
omf stat -t rfdev1-1,rfdev1-2,srv1-in1,srv1-in2,srv1-in3
omf tell -a offh -t rfdev1-1,rfdev1-2,srv1-in1,srv1-in2,srv1-in3
- Load the image on the server omf image loading commands:
omf load -t srv1-in3 -i idel.ndz
- Turn the server and Mesh nodes on:
omf tell -a on -t rfdev1-1,rfdev1-2,srv1-in1,srv1-in2,srv1-in3
Experiment Execution
The Mesh Network Controller (NC) will autonomously detect the available Mesh Nodes and establish links between the GW Node and the detected Mesh Nodes.
Configure Routing between the NC machine and the Gateway Node
The communication link between the Controller located on the srv5-lg1 compute machine and the Gateway Node must be established.
userid@console:~$ ssh native@srv1-in3
-------------------
password: native
-------------------
native@srv3-lg1:~$ sudo ./Rutgers_Package/setup_routes.sh
Routing Script
The script to setup a communication route between the NC and GW Node
#!/bin/bash
route add -host 192.168.200.10 dev enp3s0
route add -net 192.168.150.0/24 dev enp3s0 gw 192.168.200.10
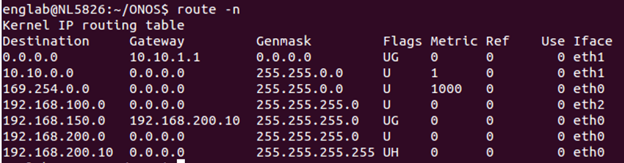
Check routes and connections are in place before starting ONOS
Display the routing table. NOTE: the user interface displayed in Figure 2 is for example purposes, your NC machine may be different. The routes for subnets 192.168.150.0, 192.168.200.0 & 192.168.200.10 should be in place as shown in Figure 2.
native@srv3-lg1:~$route -n
Expected routes are shown as per Figure 2

Figure 3: Routing tables.
Verify the GW Node is reachable by the NC Controller
native@srv3-lg1:~$ ping 192.168.200.10
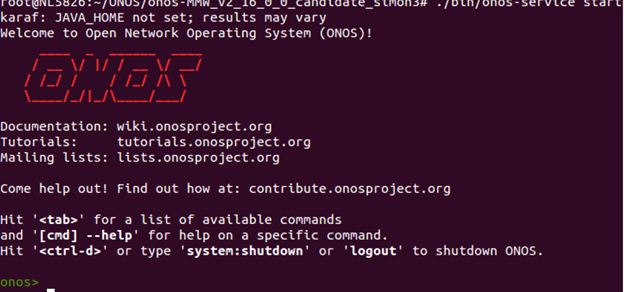
Start the ONOS controller
native@srv3-lg1:~$ ./onos/onos-1.9.0/bin/onos-service start

Figure 3: Successful ONOS startup.
Services on the Mesh Nodes
Each Mesh node is configured to execute the mesh SW upon a power cycle or soft reboot. You can manually restart the Mesh SW on each node by momentarily removing the ethernet PoE connection to each of the Nodes or use the omf command to “turn off” & “turn on” rfdev1-1 & rfdev1-2 which are the GW Node and NON-GW Node respectively . A soft reboot of the nodes can be executed by accessing the Wi-Fi debug subnet.
The Edgelink GW node can be accessed via the IP address assigned by the debug network
userid@console:>ssh root@srv1-in1
root@srv1-in1:~$ ssh root@10.113.1.102
The Edge Link NON-GW node can be accessed via the IP address assigned by the debug network
userid@console:>ssh root@srv1-in2
root@srv1-in2:~$ ssh root@10.113.1.103
Once you have accessed the node via the debug network you can ping the connected node and send iperf data. From here you can also issue the soft reboot command but ONLY if necessary, to restart the node. The bridge IP address is 192.168.150.1 and 192.168.150.3 respectively for the GW Node and the NON-GW Node.
root@ls1043ardb:#ping 192.168.150.x
(OR to REBOOT)
root@ls1043ardb:#reboot
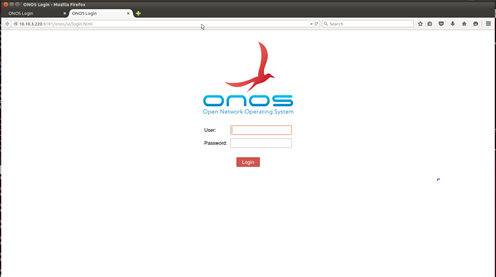
Start the ONOS GUI
Open a Google or Fire Fox browser and enter the url of the ssh or VPN tunnel established to the COSMOS sandbox 1 for your local machine to connect to a web server running on the server node.
localhost :8181/onos/ui
You should see the ONOS login page as shown in Figure 4

Figure 4: ONOS Login Page
Enter ONOS credentials:
User :      onos
Password:   rocks
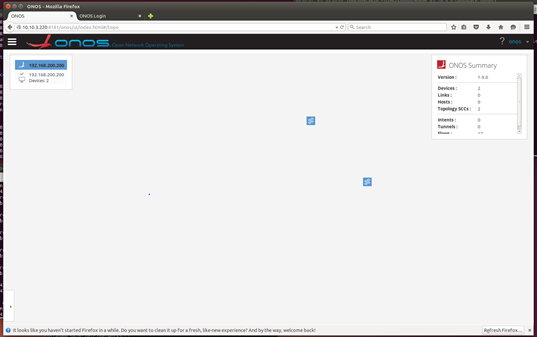
ONOS topology will display the GW node and the non-GW node as shown in Figure 5 when the network controller detects/registers the nodes.

Start the ORCHESTRATOR
The Orchestrator is a thin client application used to provision transport slices, bandwidth reservation and service level agreements (SLA). See Orchestrator User Guide for additional information.
Start the Thin Client Orchestrator
Start the TomCat Service
native@srv3-lg1:~$ sudo systemctl daemon-reload
native@srv3-lg1:~$ sudo systemctl start tomcat
--------------------------------------
Status of the tomcat service can be verified with the following:
--------------------------------------
native@srv3-lg1:~$ sudo systemctl status tomcat
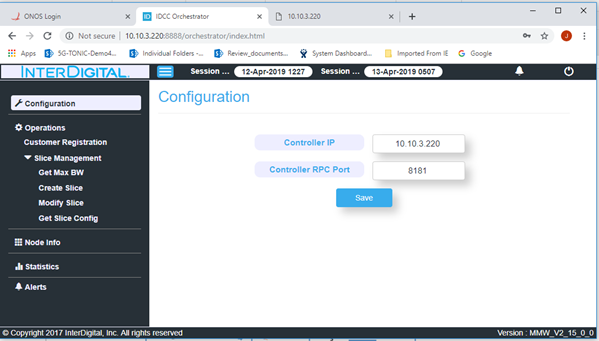
Access Orchestrator in a web browser
Open a Google or FireFox browser and enter the url of the ssh or VPN tunnel established to the COSMOS sandbox 1 for your local machine to connect to the Tom Cat web server running on the server node.
localhost:8888/orchestrator
- The Configuration Page as shown in Figure 6 should appear.

Controller IP:          where ONOS is running (via your localhost)
Controller RPC Port:    8181 (this is the port at which ONOS UI is accessed)
- Select the Save button
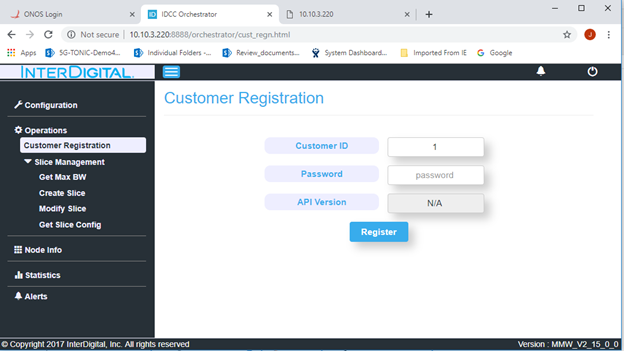
- Select the Customer Registration page as shown in Figure 7

Enter credentials:
Customer ID:        1
Password:           root
*Select Register and you should receive a “Registration Successful” indication.
- At this point you will be able to select from the operations displayed.
- Please refer to the Orchestrator User Manual for further directions and capabilities.
Saving the Node Images
If you modify software on the server node save the image by the [omf save image commands] but don't forget to first prepare the node by executing as root user (this is the example for srv5-lg1 node):
root@srv5-lg1:~# ./prepare.sh
This script will “clean” and “dump” old log files and any other unnecessary files that do not need to be saved as part of the image, thereby reducing the size of the saved image. At the end of this script, the node will shutdown (it might block your ssh window forcing you to open another one); once back on the console, you can save that node disk image with
username@console:~# omf save -n srv1-in3.sb1.cosmos-lab.org
(please note the -n option and the FQDN for the node both of which are mandatory for successful saving operation).
Attachments (7)
-
EdgeLink-Setup.jpg
(43.1 KB
) - added by 5 years ago.
Edge Link Setup in SB1 (Block diagram)
-
ONOS.png
(116.3 KB
) - added by 5 years ago.
Starting ONOS
-
ONOS-Login.png
(17.2 KB
) - added by 5 years ago.
ONOS Login Page
-
ONOS-Topo.png
(37.7 KB
) - added by 5 years ago.
ONOS Topology Display
-
Routing.png
(97.5 KB
) - added by 5 years ago.
Routing Tables
-
ONOS-Config.png
(68.3 KB
) - added by 5 years ago.
ONOS Configuration Page
-
ONOS-Register.png
(70.1 KB
) - added by 5 years ago.
ONOS Registration Page
Download all attachments as: .zip